Hummus
Updated Jan 31, 2026
My hummus recipe is the BEST; an easy authentic Lebanese recipe made with 5 ingredients in a food processor with a tip to make it extra creamy
This post may contain affiliate links. Please read our disclosure policy.

Jump to Section
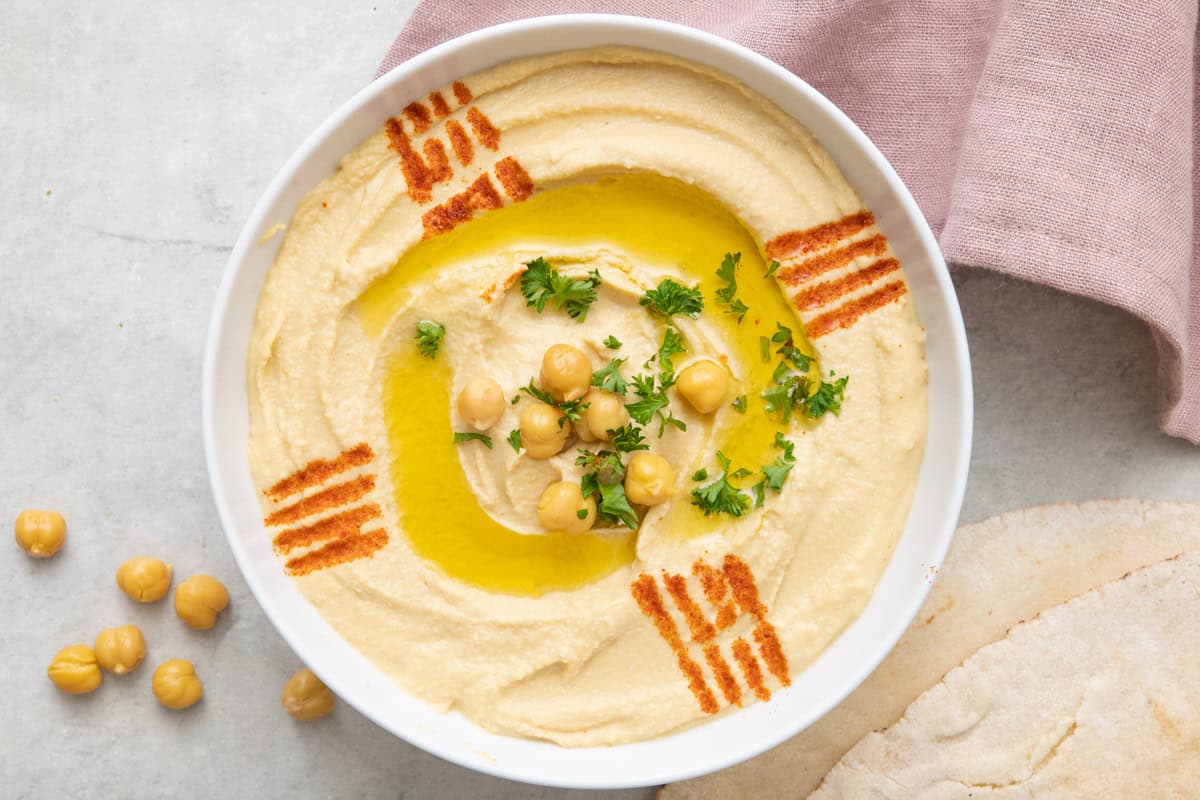
Best Hummus Recipe!

If you’re looking for the smoothest, creamiest, most authentic hummus recipe, you’ve found it! My family is Lebanese, and hummus originated in the Middle East and was made all over Arab countries for hundreds of years. So you know this is an authentic hummus recipe with the best flavor!
The word hummus in Arabic translates to chickpeas so this is essentially a chickpeas blended with tahini (sesame paste), lemon juice, garlic, and salt – that’s all you need to make hummus (plus some ice cubes which is a trick I learned from my dad to make it extra smooth and creamy!) This is seriously the best hummus recipe ever. If you’ve only had store-bought hummus, I hope you try this homemade version that not only tastes better, but also lets you control the amount and quality of ingredients!
Happy Cooking!
– Yumna
Hummus Ingredients
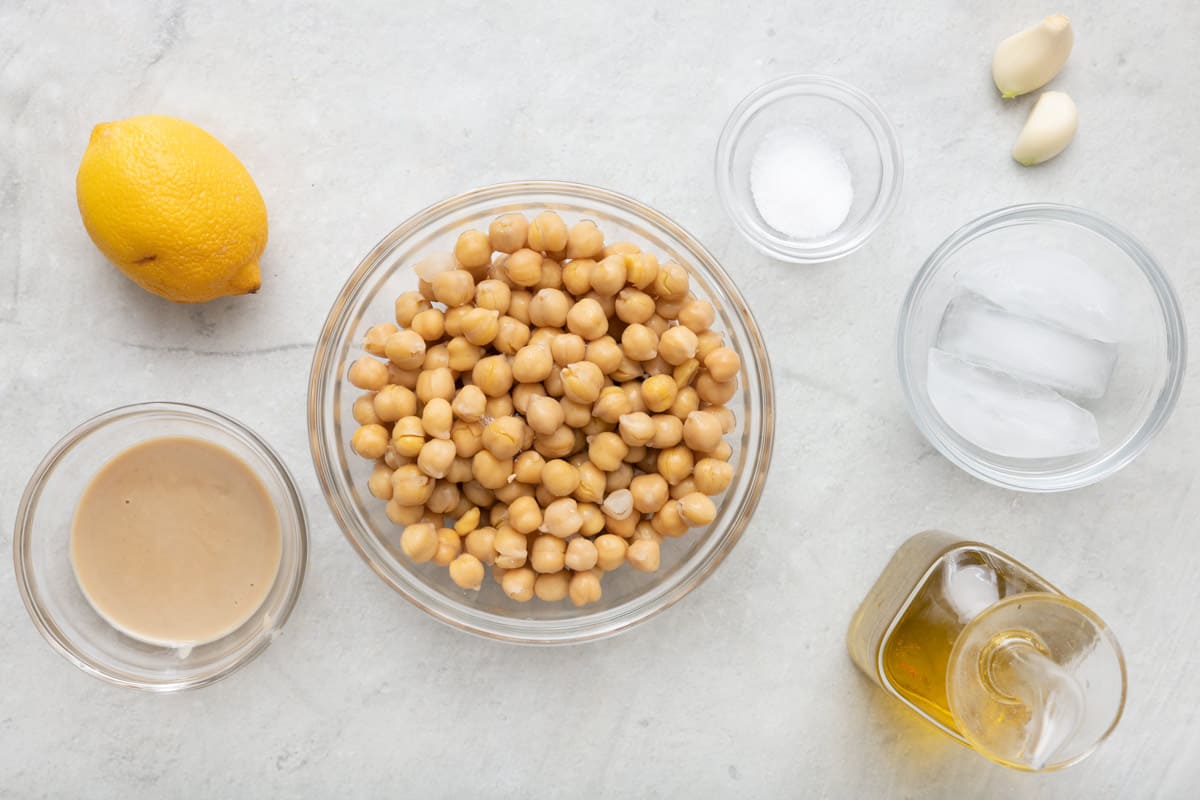
- Chickpeas: There are two options for chickpeas: 1) use dry chickpeas cooked in an instant pot or pressure cooker or 2) use canned chickpeas.
- Tahini: Look for tahini with only 1 ingredient – mechanically hulled sesame seeds. And make sure the tahini is not separated. If it does get separated, give it a good stir before adding it to the food processor. For anyone allergic to tahini, I also have a hummus recipe without tahini.
- Lemon: Freshly squeezed.
- Garlic: Use fresh garlic for the best taste and remove any green sprouts.
- Salt: Use my suggested amount but then taste and adjust as needed.
How to Make Homemade Hummus
I have tried several hummus recipes but yesterday I tried yours, haven’t had hummus taste so good. I guess having ice cubes in there, makes them blend well and give that creamy texture makes the difference. Thank you! –Ruchika

Hummus
Video
Ingredients
- 1 (15-ounce) can chickpeas
- 3 tablespoons lemon juice
- 2 tablespoons tahini
- 2 small garlic cloves
- ¾ teaspoon salt
- 3 ice cubes
- Extra-virgin olive oil for serving
- Paprika for serving
- Chopped fresh parsley for serving
Instructions
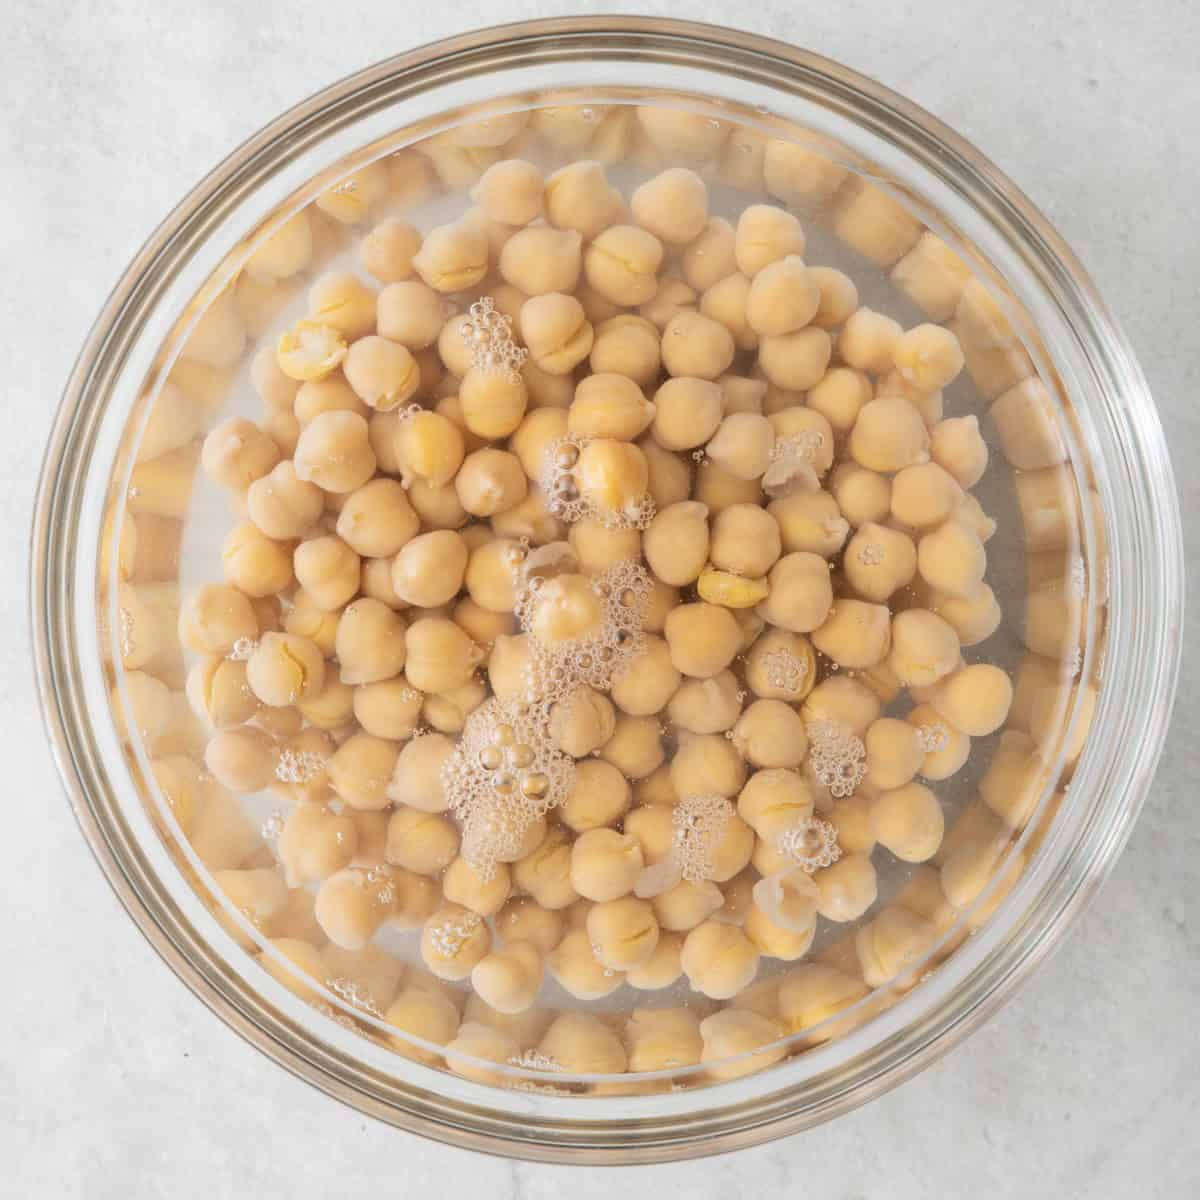
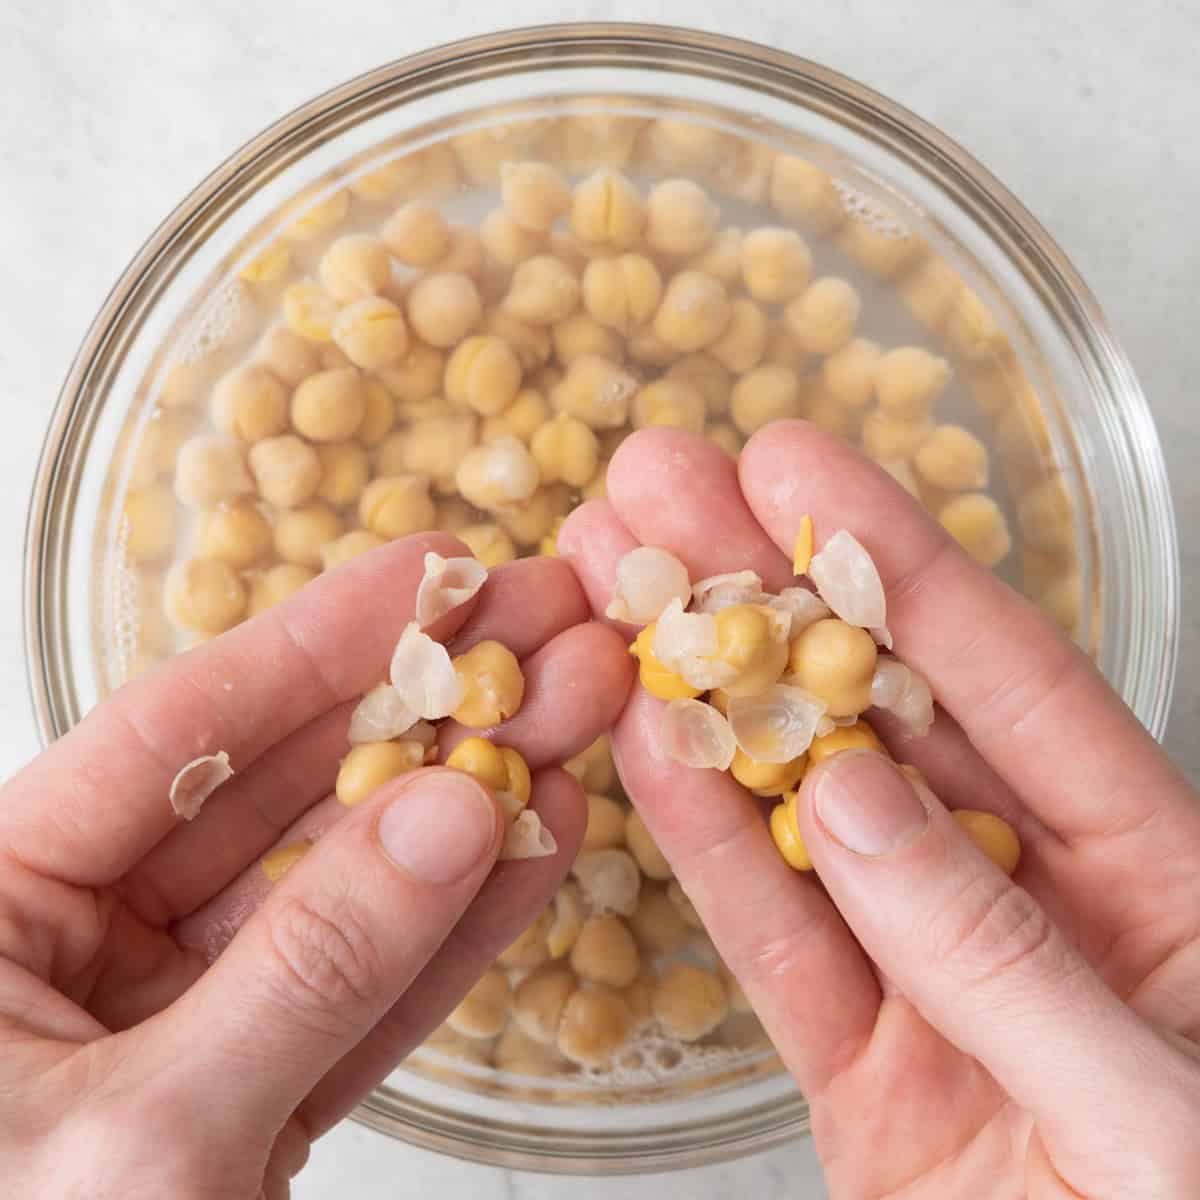
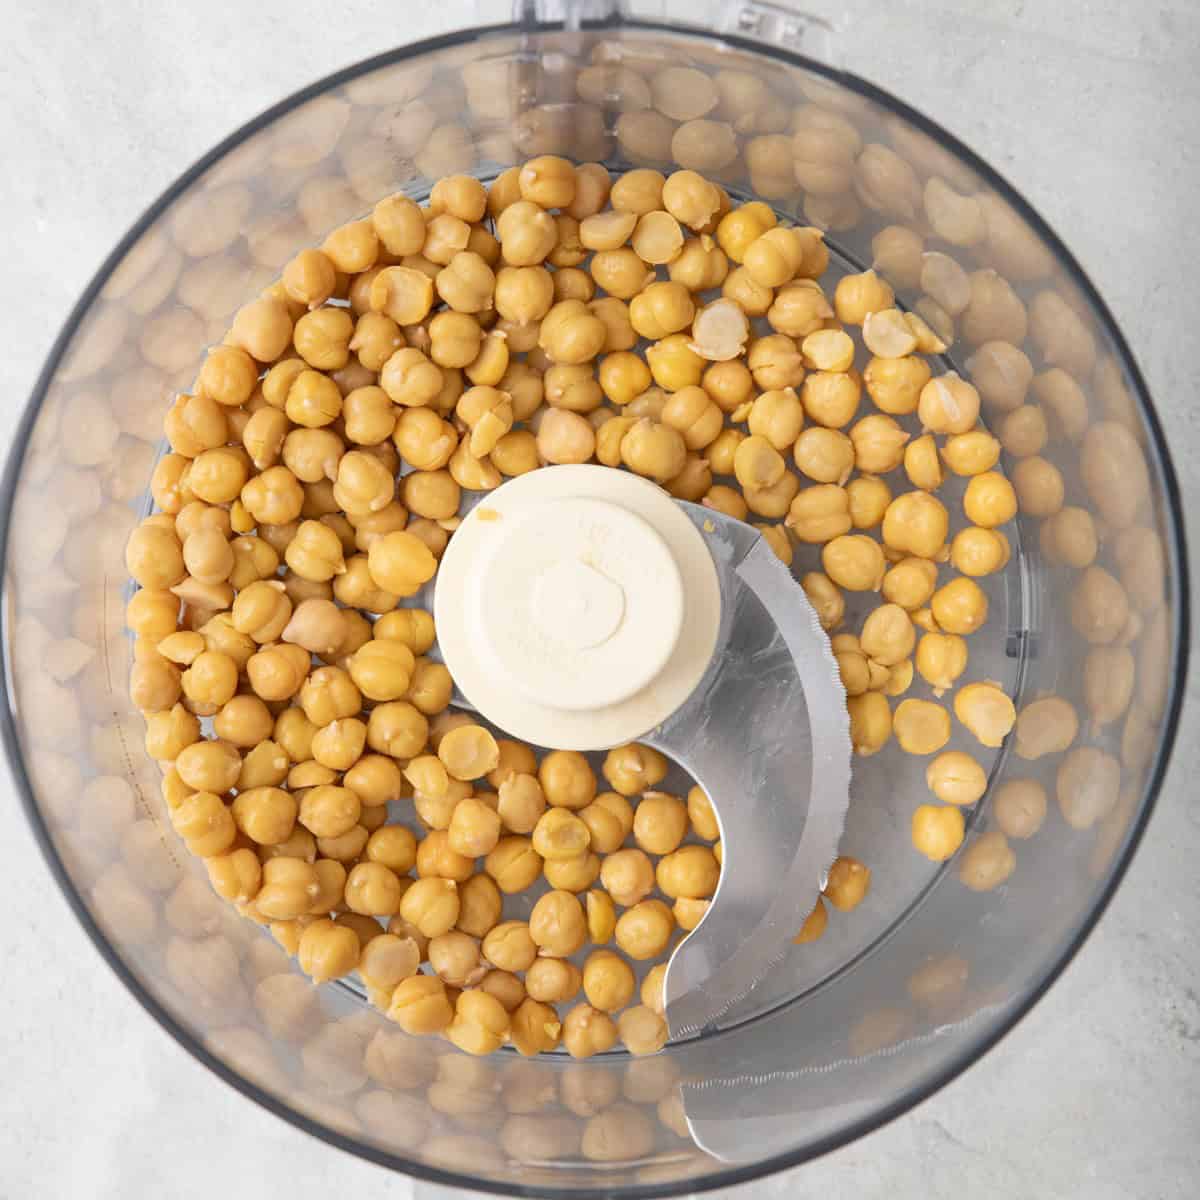
- Place the chickpeas in a large bowl of warm water. Rub them with your fingers to release the skins, which will easily float to the surface of the water. Skim the skins from the water with a slotted spoon and discard. This is an optional step, but peeling the chickpeas is what yields a super creamy texture.
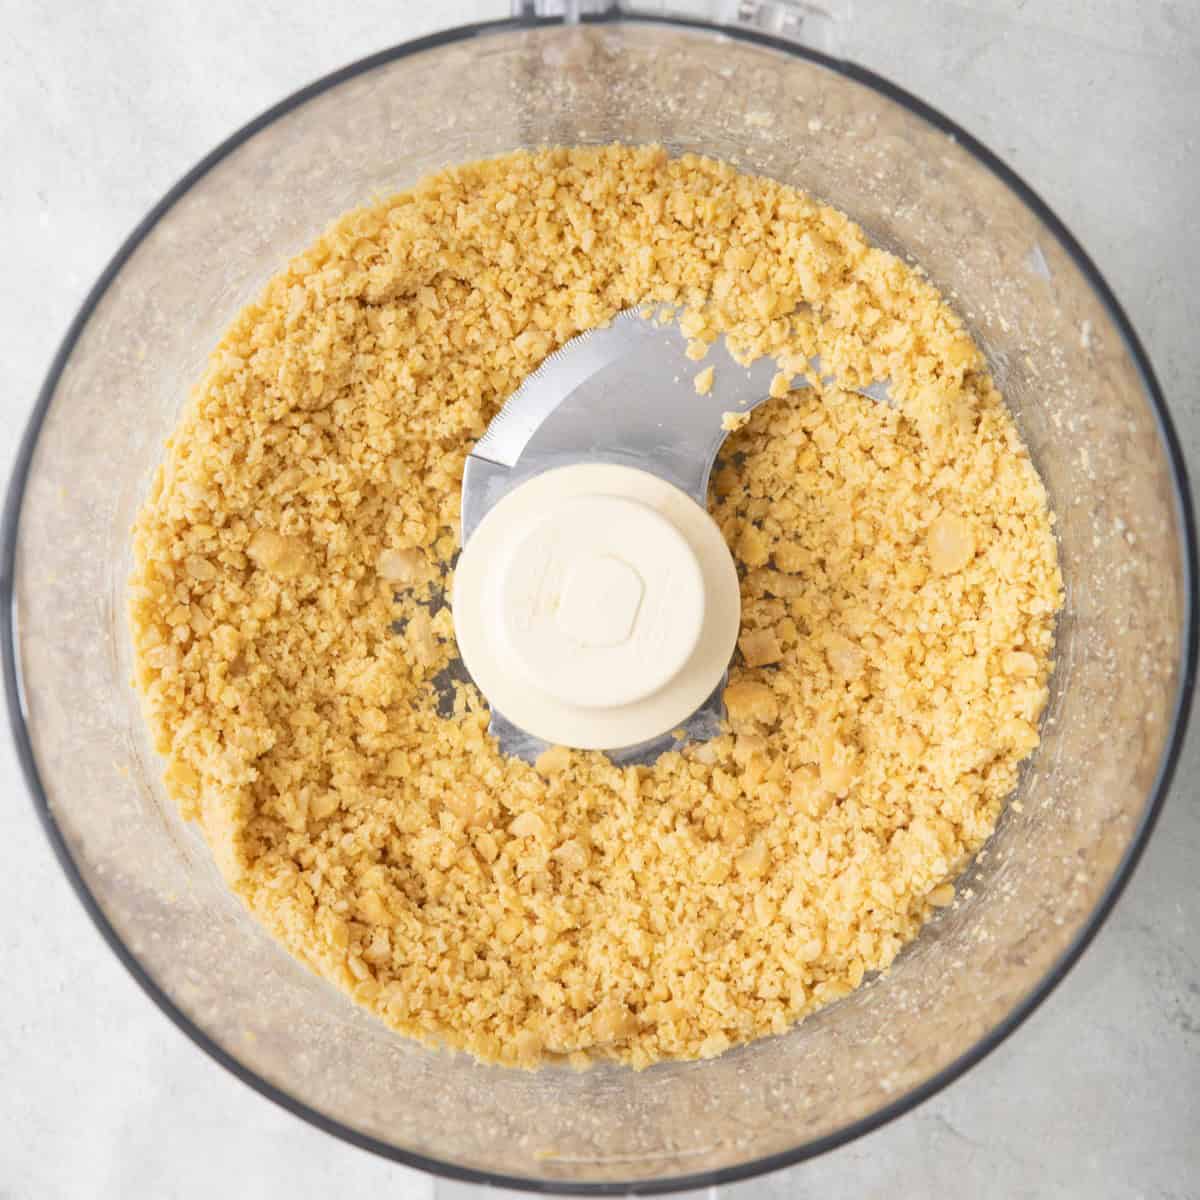
- Drain and dry the chickpeas as thoroughly as possible. Transfer the chickpeas to a food processor and pulse into a fine, breadcrumb-like texture, scraping down the sides as needed, about 15 seconds total.
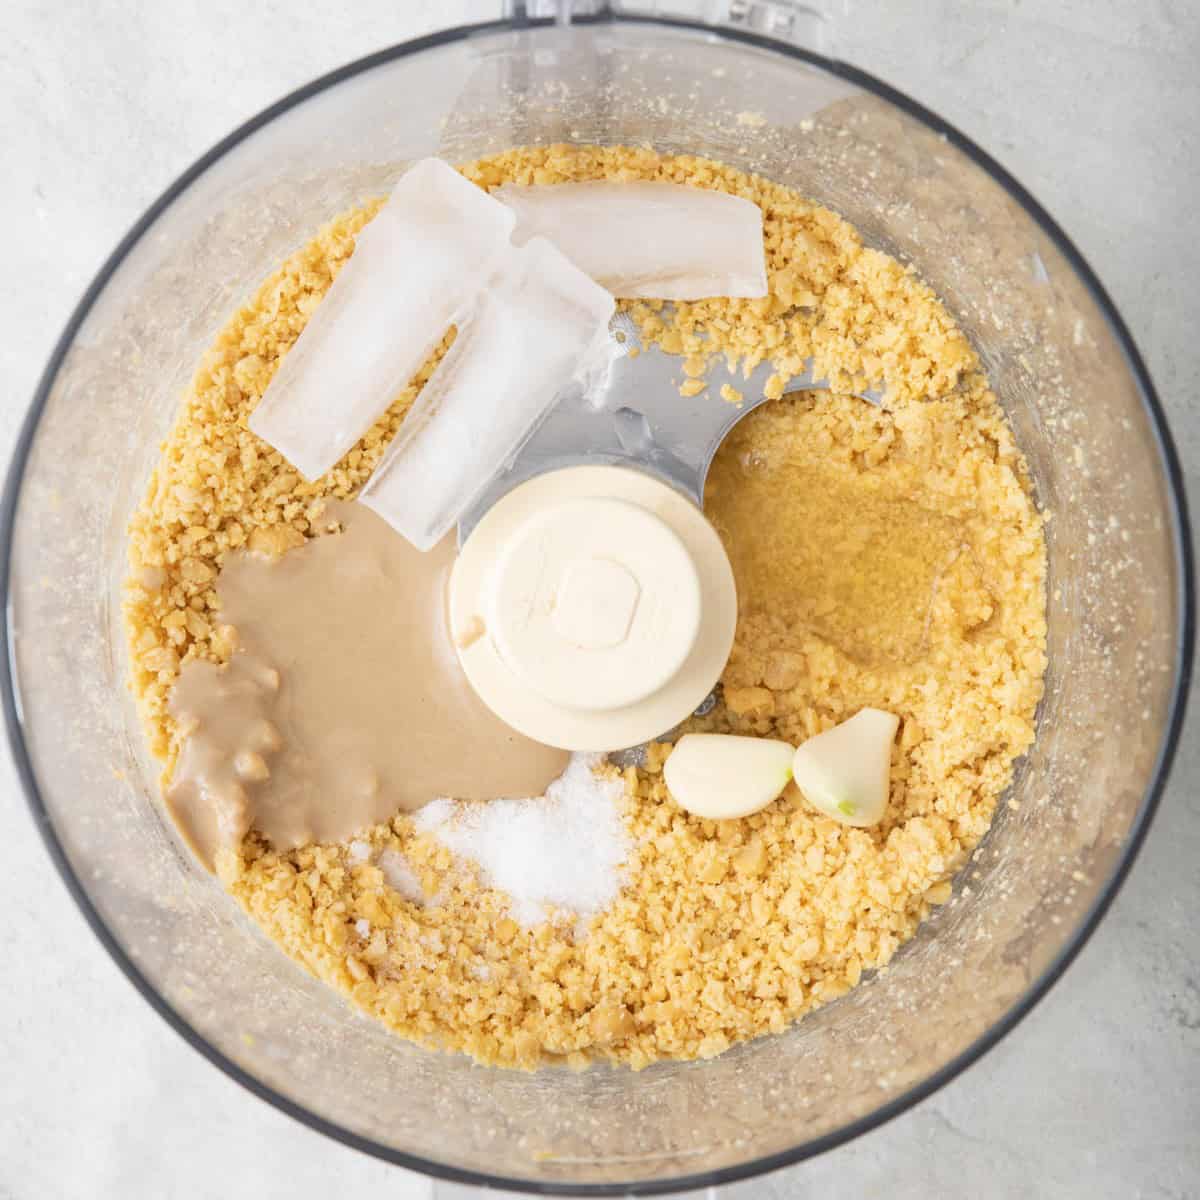
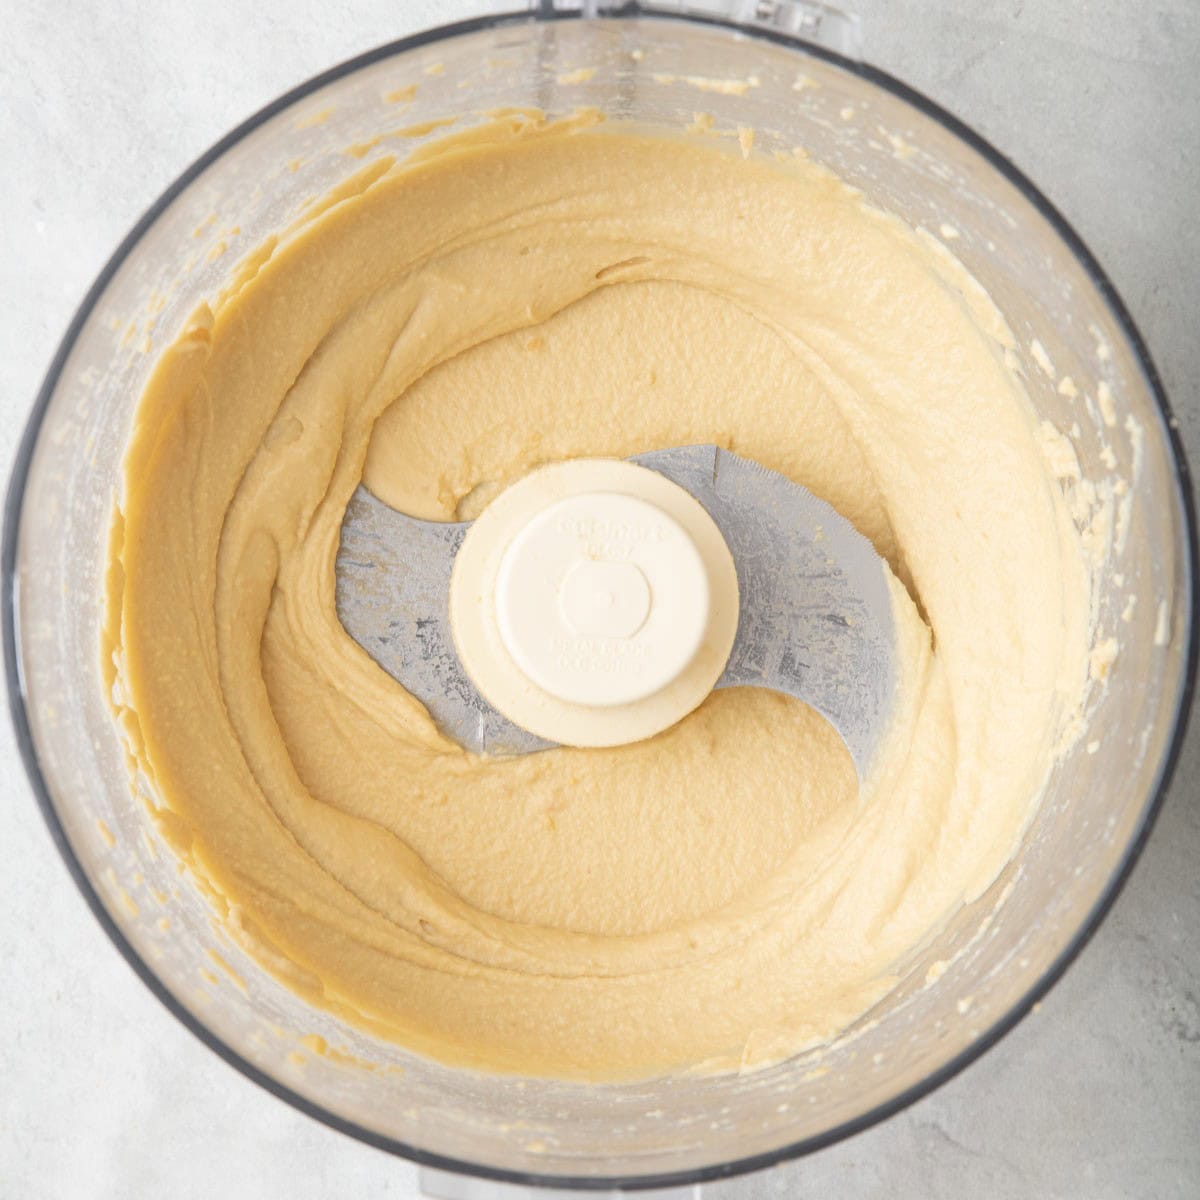
- Add the lemon juice, tahini, garlic, salt, and ice cubes. Blend until completely smooth, about 5 minutes. Taste the hummus and adjust the flavor as needed by adding more lemon juice or salt.
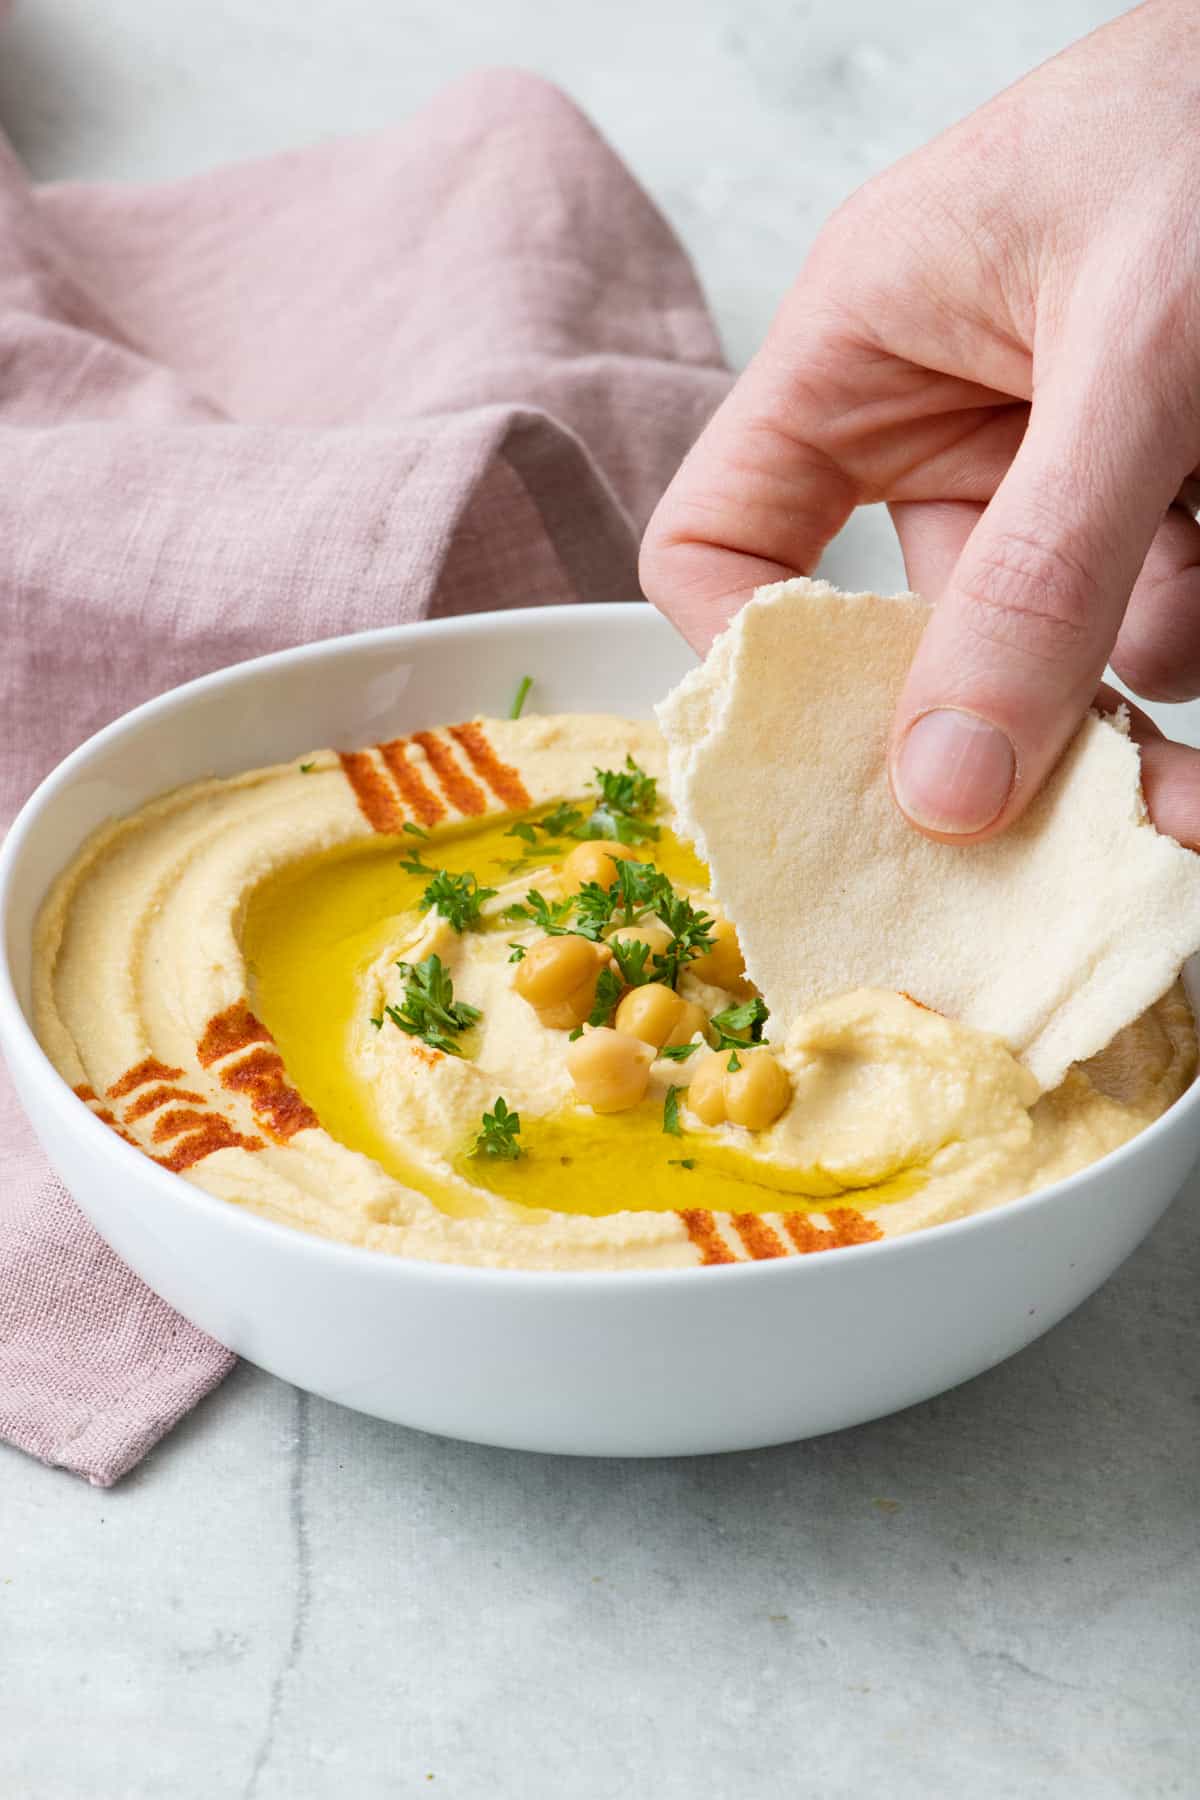
- Spread the hummus onto a plate or into a bowl, sweeping the hummus with the back of a spoon to create swirls for catching the olive oil. Drizzle the hummus with olive oil and then sprinkle it with paprika and fresh parsley. Serve cool or at room temperature.
Notes
- My Top Tip: Peel the chickpeas. Peeling chickpeas is tedious and takes about 15 minutes but it really is the best hack for making homemade hummus with a smooth and creamy texture.
- Storage: Store any leftovers in an airtight container. They will last about one week in the fridge.
- Freezing: You can freeze hummus for up to 3 months. Just make sure to put it in an airtight container and don’t fill it all the way up because it will expand as it freezes.
- Sourcing: You can find the tahini at Middle Eastern markets, natural-food stores or even in large supermarkets, often located with other Middle Eastern ingredients.
Nutrition
Nutrition information provided is an estimate. It will vary based on cooking method and specific ingredients used.
Recipe Video Tutorial
Recipe Variations
- Roasted red pepper hummus: Add roasted red peppers to the food processor along with the other ingredients to give it a roasted sweet flavor.
- Beet hummus: Blend one medium roasted beet or store-bought boiled beet with the hummus ingredients for the prettiest hummus ever!
- Spicy hummus: Add 2 tablespoons of harissa paste, 1 tablespoon of hot sauce or ¼ teaspoon of cayenne, crushed or aleppo pepper for an extra kick.
- Herby hummus: Blend ¼ cup packed basil, cilantro, parsley or a combination of herbs with the other ingredients and it will turn bright green.
- Avocado hummus: Add 1 or 2 avocados to the processor. Make sure it’s ripe and it will make your hummus extra buttery and smooth.
- Sun-dried tomato hummus: Blend in 1/4-½ cup of sun-dried tomatoes (oil-packed or rehydrated) for a tangy, savory taste with a fun red color.
- Roasted garlic hummus: Swap out the raw garlic cloves for roasted garlic which are more mellow and sweet. Grab my tutorial for making roasted garlic, then squeeze out the softened cloves and add them to the food processor.
- Hummus Recipe Without Tahini: This is a good variation to try if you are allergic to tahini.
Delicious! Every other hummus recipe I’ve tried has required me to adjust the ingredients at the end to make it taste just right. I didn’t have to do that with this recipe, except for the addition of a tiny bit of salt. It was perfect! The only suggestion I have (for your readers, not you), is to heed the advice and use SMALL garlic cloves. Mine were a bit big, and let’s just say I’ll be able to ward off any vampires tonight. Thanks for the wonderful recipe! –Rebecca
Recipe Tips
- Soak chickpeas in baking soda. Whether you are using dry or canned chickpeas, the baking soda softens the skin. The softer skin helps them peel off easily or blend more easily. And here’s a bonus benefit: baking soda can also help reduce gas and bloating! USe 1-2 teaspoons for every 15 oz can of chickpeas.
- Peel the chickpeas. Peeling chickpeas is tedious and takes about 15 minutes but it really is the best hack for making homemade hummus with a smooth and creamy texture.
- Add ice cubes to the blender. This sounds a bit crazy, but it’s a tip I learned from my dad, and it totally works. It gives it a freshly churned ice cream-like texture and lightens up the color.
- Use a strong blender or food processor and blend for at least 4-5 minutes. I’ve seen a difference in the texture by testing two levels of blenders, and the blender definitely matters. It’s hard to replicate store-bought and restaurant hummus because of their industrial type of blenders, but one hack you can try is to just blend longer!
Yumna, I’ve just discovered your Lebanese hummus recipe. Wow this is absolutely delicious. I’ve been making hummus for years & thought it was quite good, but this is on a whole different level. I found skinning the chickpeas a bit tedious, but as you say, so worth it. From now on this is how I make hummus. Thank you! – Alison
Serving Ideas
- Veggies dip: cut carrot sticks, celery sticks, sliced bell pepper and even sliced radishes are great with hummus.
- Bread dip: store bought or homemade pita, pita chips, or any crackers.
- Sandwiches and wraps spread: like my veggie sandwich, hummus toast, pinwheel sandwiches.
- Sauce in many recipes: I’ve made hummus pasta using hummus as a sauce, hummus chicken where I breaded chicken with hummus, Mediterranean grain bowl where I used hummus as a dressing and chicken meal prep where I used hummus as a sauce.
FAQs
Yes, you can make hummus without a food processor by using an immersion blender, mortar and pestle or potato masher. The food processor is the fastest with the smoothest results, but these other methods totally work.


Comments
This is such a great hummus recipe. I’m sometimes out of tahini and use almond butter instead and it still tastes amazing!
Thank you so much! I’m so glad you love the hummus. Almond butter is such a smart swap when you’re out of tahini! I love hearing how you made it work with what you had!
This is the BEST hummus and is my go to every time I want to make it. We are an ingredients household and I make this fairly often. It’s a huge hit in my home.
Because I have a high powered food processor and have found that I can get by without skinning the chickpeas and still get a fabulously smooth hummus. Using the ice cubes is a must. But if using a lower powered food processor you definitely want to skin the chickpeas. Seriously, though, this yields the best, most authentic hummus. My family absolutely loves it. I’ve made this recipe multiple times and it comes out great every time.
I’m glad you love this recipe so much, Rebekah! Makes me so happy to hear. Thanks for sharing!
Easy and delicious! Not sure why I keep buying hummus. The most tedious part is peeling off all the skins but it’s worth it.
So glad it turned out delicious! Once you start making your own, you realize how easy it really is, minus the pesky peeling part!
YUMMY!!!
Thank you! So glad you think so. It’s one of my favorites!
Our daughters loved this but the only problem we had was that our blender was weak and we had to keep on adding water to make it work! But the final result was delicious especially on your hummus toast!
I’m glad you made it work and that it turned out delicious! So glad you all enjoyed it on the hummus toast!
Growing up all I knew was the store bought brand of hummus at the store with the red cap, yuck. I think it’s Citric Acid or something that gives it an off taste.
Your homemade hummus is better. I always process the garlic and lemon first though.
I’m so glad you found my recipe and tried it! It really is so easy to make it at home!
Can you double this?
Definitely! At the top of the ingredients list, you can switch to “2x” to see the amount of ingredients you need for doubling the recipe. Hope that helps!
Yes, this is exactly how my Batroun grandparents on both sides make hummus.
The ice is best way to make creamy hummus.
I also like your meat pie recipe. Typically, I use spinach in the pies with all of our wonderful spices.
Thank you Yumna for all of your excellent recipes.twice to your good health!
That means so much, thank you! I love hearing that it’s how your Batroun grandparents made hummus, too. The ice really does make such a difference for that creamy texture. And your spinach meat pies sound so delicious. Thank you so much for your kind words and for being here!
See All Comments