Pan Seared Chicken Thighs
Updated Jul 14, 2026
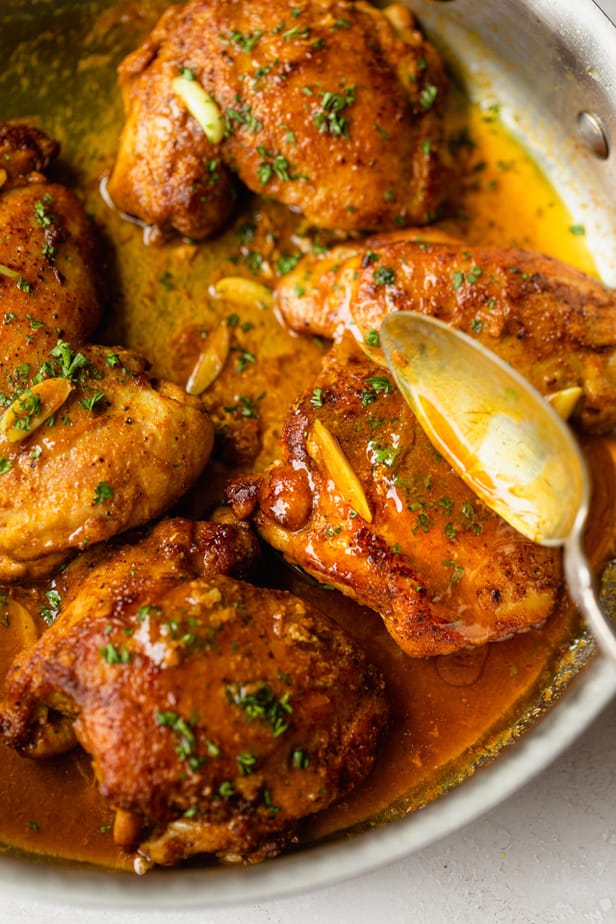
Simple pan seared chicken thighs with a spiced crust and a quick garlic pan sauce. This is an easy weeknight dinner that comes together in one skillet.
This post may contain affiliate links. Please read our disclosure policy.
One of my favorite weeknight meals is this pan-seared chicken thigh recipe that takes 15 minutes from prep to serving. The seasoning mix I use gives the chicken thighs the best flavor. These pan-seared chicken thighs are easy enough to make for a weeknight meal; you can easily double and triple the recipe for leftovers. Just be sure not to over-crowd the pan if you do.
Jump to Section
Recipe testing notes

For the past 10 years, I’ve tested every recipe before sharing it with you! These notes give you a peek into the process of developing this pan seared chicken thighs recipe.
The crust was the whole thing I was chasing here, and my first couple attempts didn’t get one. It turned out I wasn’t patting the thighs dry enough, so they steamed in the pan instead of searing. Once I really dried them off with paper towels first, they browned like they were supposed to.
The hard part was leaving them alone. I actually let them sit untouched for the full 7 minutes, and that’s the one that got that deep golden crust on the thighs.
The pan sauce was almost an afterthought that ended up being my favorite part. After the chicken came out, there were all these browned bits stuck to the bottom, and a splash of broth lifted them right up into a quick sauce. It felt like a waste to leave that flavor in the pan.
Happy Cooking!
– Yumna
Pan Seared Chicken Thighs Ingredients
- Chicken thighs: I use boneless, skinless chicken thighs. You can use bone-in thighs, but you’ll need to cook them longer. Or you can use chicken breasts, but you’ll need to flip them earlier. Pat them dry with paper towels before seasoning to get a deep, golden crust.
- Seasonings: Onion powder, cumin, coriander, paprika, turmeric, salt, and black pepper. Mix the spices before seasoning the chicken so everything is evenly distributed.
- Oil: I use olive oil, but avocado oil works if that’s what you have.
- Garlic: I slice the garlic instead of mincing it for a milder flavor. Read my tips on how to slice garlic. You can substitute 1 teaspoon garlic powder for the 4 cloves of sliced garlic, but add it to the spice mixture instead of the pan.
- Broth: I use low-sodium chicken broth, but you can use vegetable broth too.
How to Make Pan Seared Chicken Thighs
These step-by-step photos show exactly how I make pan seared boneless chicken thighs on the stove top. For the full ingredient list and detailed instructions, head to the recipe card below, or jump straight to the → Pan Seared Chicken Thighs Recipe
1. MIX THE SEASONING
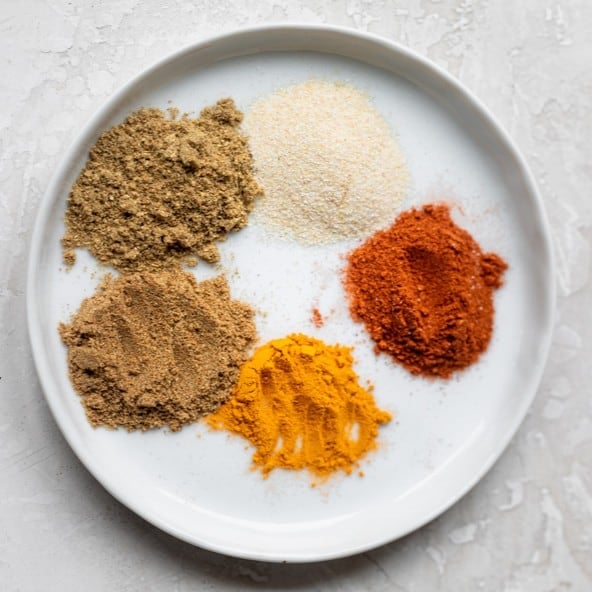
Whisk together the onion powder, cumin, coriander, paprika, turmeric, salt, and black pepper in a small bowl until the spices are evenly combined.
2. PREPARE THE CHICKEN
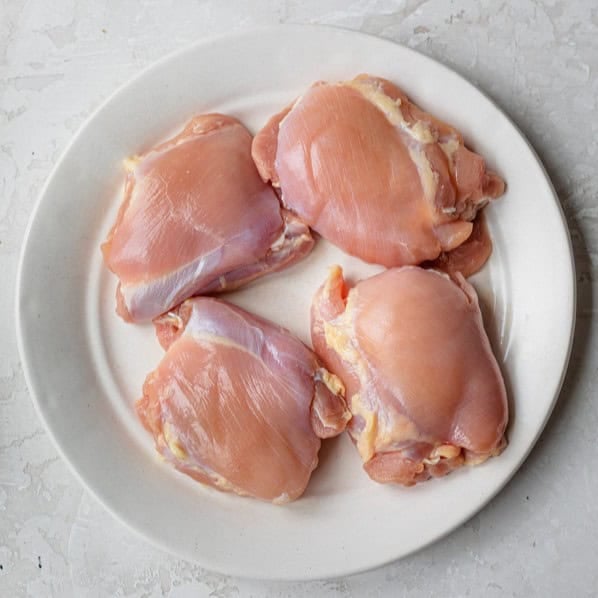
Pat the chicken thighs dry with paper towels before seasoning. Removing the extra moisture helps the chicken brown instead of steam.
3. SEASON THE CHICKEN
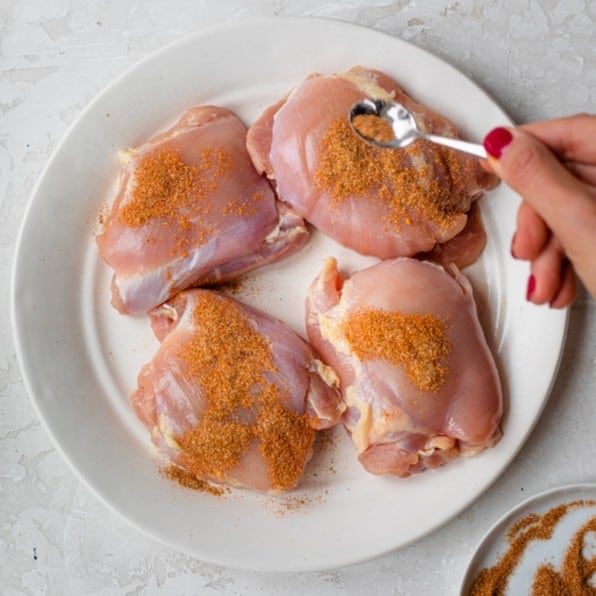
Sprinkle the spice mixture evenly over both sides of the chicken thighs so each piece is well coated.
4. RUB IN THE SPICES
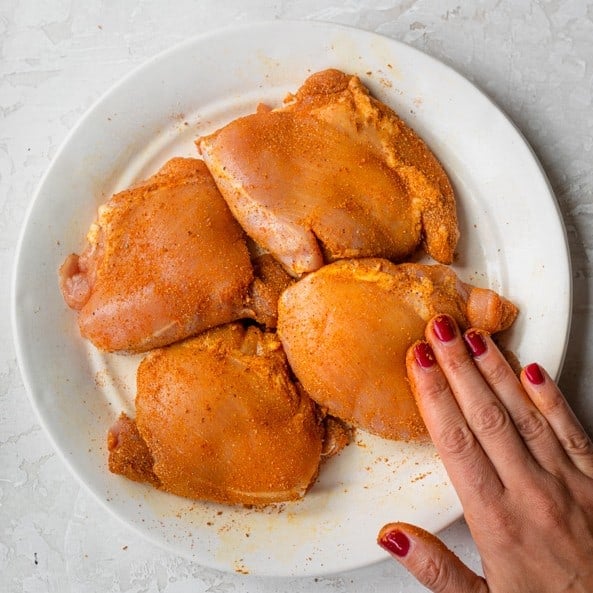
Use your hands to gently press the seasoning into the chicken so it sticks evenly before it goes into the hot skillet.
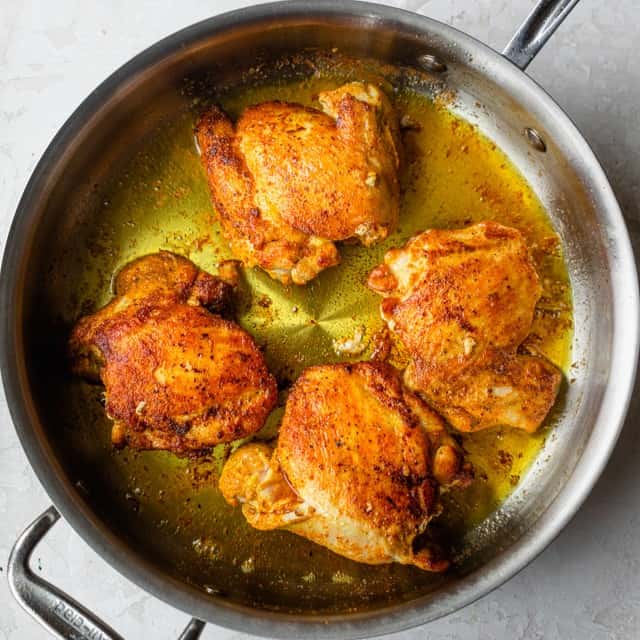
5. SEAR THE CHICKEN

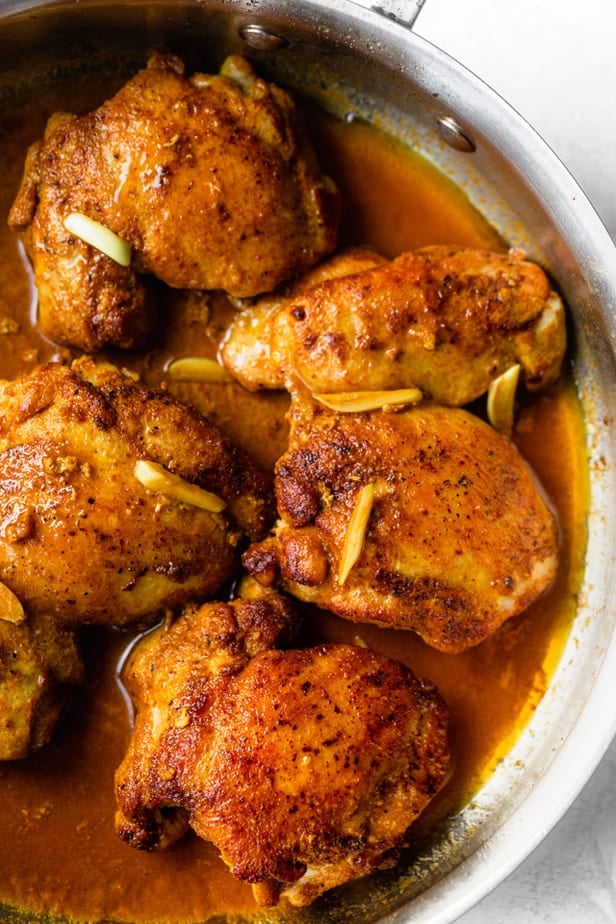
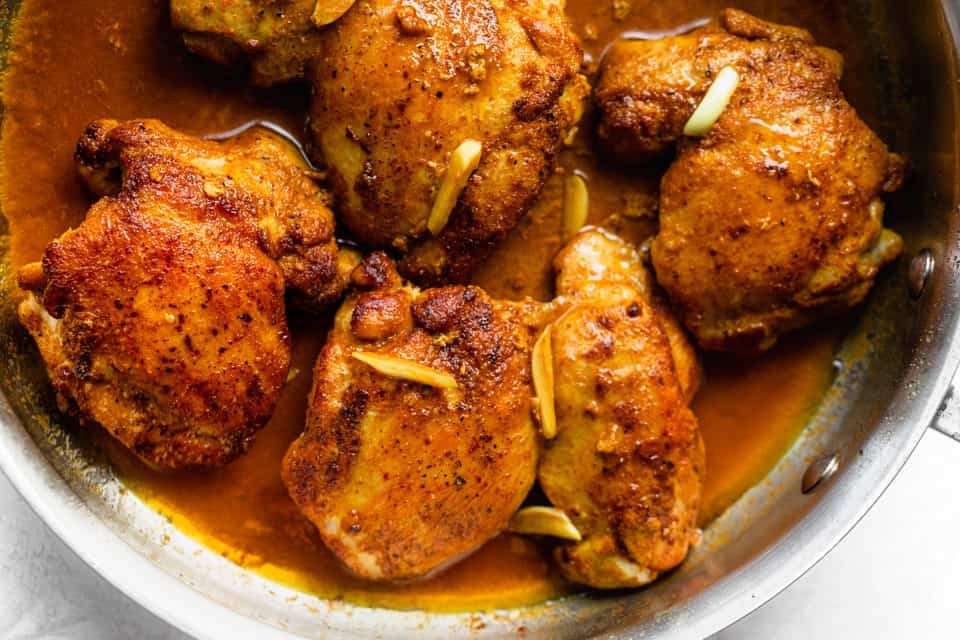
Heat the olive oil in a large skillet. Once the oil is hot, place the chicken presentation-side down in a single layer. Don’t overcrowd the pan! Leave it undisturbed until it naturally releases from the pan and develops a deep golden crust, then flip and continue cooking until the juices run clear or a thermometer reads at least 165ºF.
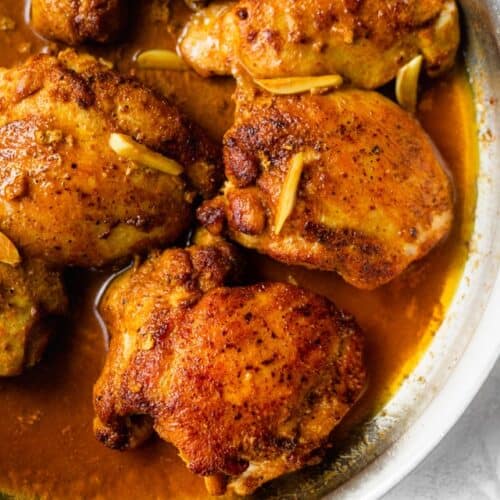
6. ADD GARLIC AND PAN SAUCE
Lower the heat and cook the garlic until it’s lightly golden and fragrant. Pour in the chicken broth, scraping up any browned bits from the bottom of the pan, and let the sauce simmer to thicken. Spoon the pan sauce over the chicken, garnish with parsley, and serve.
Full Pan Seared Chicken Thighs Recipe
Pan Seared Chicken Thighs Recipe
Video
Ingredients
- 1 ½ pounds chicken thighs boneless skinless, about 4 pieces
- 1 teaspoon onion powder
- 1 teaspoon cumin
- ½ teaspoon coriander
- ½ teaspoon paprika
- ½ teaspoon turmeric
- ¾ teaspoon salt
- ½ teaspoon black pepper
- 1 tablespoon olive oil
- 4 garlic cloves sliced
- ½ cup chicken broth
- Chopped parsley for garnish
Instructions
- Pat the chicken thighs dry with paper towels. In a small bowl, whisk together onion powder, cumin, coriander, paprika, turmeric, salt, and black pepper. Season both sides of the chicken thighs with the seasoning mix.
- Heat a large skillet over medium-high heat. Add the olive oil and carefully place the chicken thighs, presentation-side down, into the hot pan, making sure not to overcrowd them.
- Cook the chicken thighs for 7 minutes without touching until they develop a golden brown crust. Flip the chicken to the other side and continue to cook until they reach an internal temperature of at least 165°F, 8–10 more minutes.
- Lower the heat to medium-low, add garlic, and cook for 1 minute, until garlic is golden and fragrant. Pour chicken broth to deglaze the bottom and sides of the pan with the crispy browned bits until they're no longer sticking to the pan.
- Remove the chicken thighs from the pan and let them rest for a few minutes before slicing or serving. Spoon the pan sauce over the chicken. Garnish with fresh chopped parsley and serve immediately.
Equipment
Notes
Nutrition
Nutrition information provided is an estimate. It will vary based on cooking method and specific ingredients used.
Recipe Variations
- Add vegetables to the skillet: After the chicken finishes cooking, remove it from the pan. Sauté 8 ounces sliced mushrooms or 1 cup halved cherry tomatoes, then return the chicken to the pan with the veggies to warm through.
- Stir in olives and capers: Add ¼ cup sliced Kalamata olives and 1 tablespoon capers to the pan sauce during the last minute of cooking.
- Make it creamy: Stir 2 tablespoons heavy cream or plain Greek yogurt into the pan sauce after removing the skillet from the heat.
Recipe Tips
- Marinate the chicken. Since this is a dry rub, the marinating time isn’t crucial, but I recommend doing it if you have time for better flavor! 30 minutes is great, but you can marinate it for up to 24 hours.
- Rest the chicken for 5 minutes before cutting. This helps the pan fried chicken thighs reabsorb the juices and stay extra juicy.
Serving Ideas
- Grains: Serve the pan fried chicken thighs over Lebanese Rice, Butternut Squash Risotto, Cilantro Lime Cauliflower Rice, or even a Mediterranean Rice Salad.
- Potatoes: Chicken thighs are so delicious with potatoes! Try them with my Healthy Mashed Potatoes, Garlic Roasted Potatoes, or Air Fryer Potatoes.
- Salads: Pan seared chicken is a great way to add protein to a salad and make it a full meal. Try it with my Mediterranean Chopped Salad, Pearl Couscous Salad, or Kale Tabbouleh Salad.
Troubleshooting
The presentation side of a chicken thigh is the smooth, rounded side that you put facing up when serving. The underside of the chicken thigh usually has more folds, seams, and exposed muscle fibers. When pan searing chicken thighs, I usually place the presentation side down first because that’s the side that develops the nicest, most even golden crust. Then I flip it to finish cooking on the second side.
The most common reasons are that you didn’t pat the chicken dry enough, the pan wasn’t hot enough, or you moved the chicken too soon. For crispy pan seared chicken thighs, let the chicken cook undisturbed until it naturally releases from the pan before flipping.
If the chicken reached 165°F but still seems chewy, it may just need a little more time. Boneless, skinless chicken thighs are usually most tender around 170°F to 175°F, when more of the connective tissue has had time to break down.
Garlic cooks much faster than the chicken. Wait until the chicken is nearly finished before adding the garlic, and reduce the heat so it turns lightly golden instead of dark brown.
Chicken naturally releases some moisture as it cooks, especially if you didn’t pat it completely dry first. Continue cooking until that liquid evaporates and the chicken begins to brown, rather than flipping it while the pan is still full of moisture.


Comments
I made only the basic recipe (definitely adding mushrooms, tomatoes and olives next time), but it went over VERY well. My GF could possibly be the pickiest eater ever, but she absolutely loved this dish, so – many thanks! (PS, I have loved all your quickie IG posts, too!)
This comment made my day! I’m so glad she loved the dish and that it went over so well. And I’m so glad you love the IG posts too. Thank you so much for taking the time to leave a review!
I made this recipe for the first time and it came out great, so, thank you for sharing. I just entered my email address for you to email it to me, but, I’m wondering if there is any way to Pin this recipe. It will most likely get lost in my emails.
Hi! So glad the recipe came out great. To save the recipe on Pinterest, tap the Pinterest logo on the top right of any recipe photo. Let me know if you still can’t find it!
Easy to make and so yummy! Thank you for sharing!
I’m happy to hear it was easy and yummy! So glad you enjoyed it!
The chicken burned using the recommended medium-high heat. I used a cast iron skillet. I turned it down to medium and then to less than medium to finish up the second side. I should have checked on it sooner, but the recipe said leave it alone. That was a mistake. I had to cut off the burned parts to eat it. May try it again, but on medium heat.
I’m sorry that happened! Cast iron can definitely run hotter and hold heat longer than other skillets, so medium-high may have been too hot here. Leaving the chicken undisturbed helps it get a good sear, but it’s always okay to peek and adjust the heat if the spices are browning too quickly. Medium heat sounds like the right call for your pan, and I’d also make sure the oil is shimmering but not smoking before adding the chicken. Thank you for sharing your experience, and I hope it turns out better if you give it another try!
I just made your recipe tonight and we thought it was delicious – tender and flavorful!
I’m so happy to hear that, Betsy! So glad you enjoyed it and found it flavorful!
Bland. My family did not like nor did I.
Bummer, sorry to hear the chicken turned out bland. Did you pat the chicken thighs dry with paper towel before seasoning? Making sure they’re dry helps the seasonings stick. Some commenters note that they double the seasoning amount for extra flavor, maybe that could help. Thank you for the feedback.
I am not a cook. My wife is traveling and left some frozen chicken thighs for me to defrost and prepare. I augmented with some little potatoes in the skillet. This recipe was simple enough for a non-cook to get right and it was delicious. Thank you!
I love that, Greg! I think this qualifies you as a cook now! But I know what you mean, and I’m so happy this recipe worked for you. Glad you enjoyed!
Tastes Great ! Easy recipe.
Thank You
So happy to hear that you liked it!
Delicious!
I’m so happy you thought it was delicious, Jamie!
I am going to try these tonight. Do you have favorite brands of spices? And what else can you use this spice mix on?
I prefer Simply Organics. You can use this spice mix on any meat. It would taste good on potatoes too! Hope you enjoy!!
See All Comments