Peanut Butter Cups
Published Apr 14, 2024
I love peanut butter cups, and they're surprisingly easy to make at home. These ones use only 4 ingredients—so simple and so good!
This post may contain affiliate links. Please read our disclosure policy.
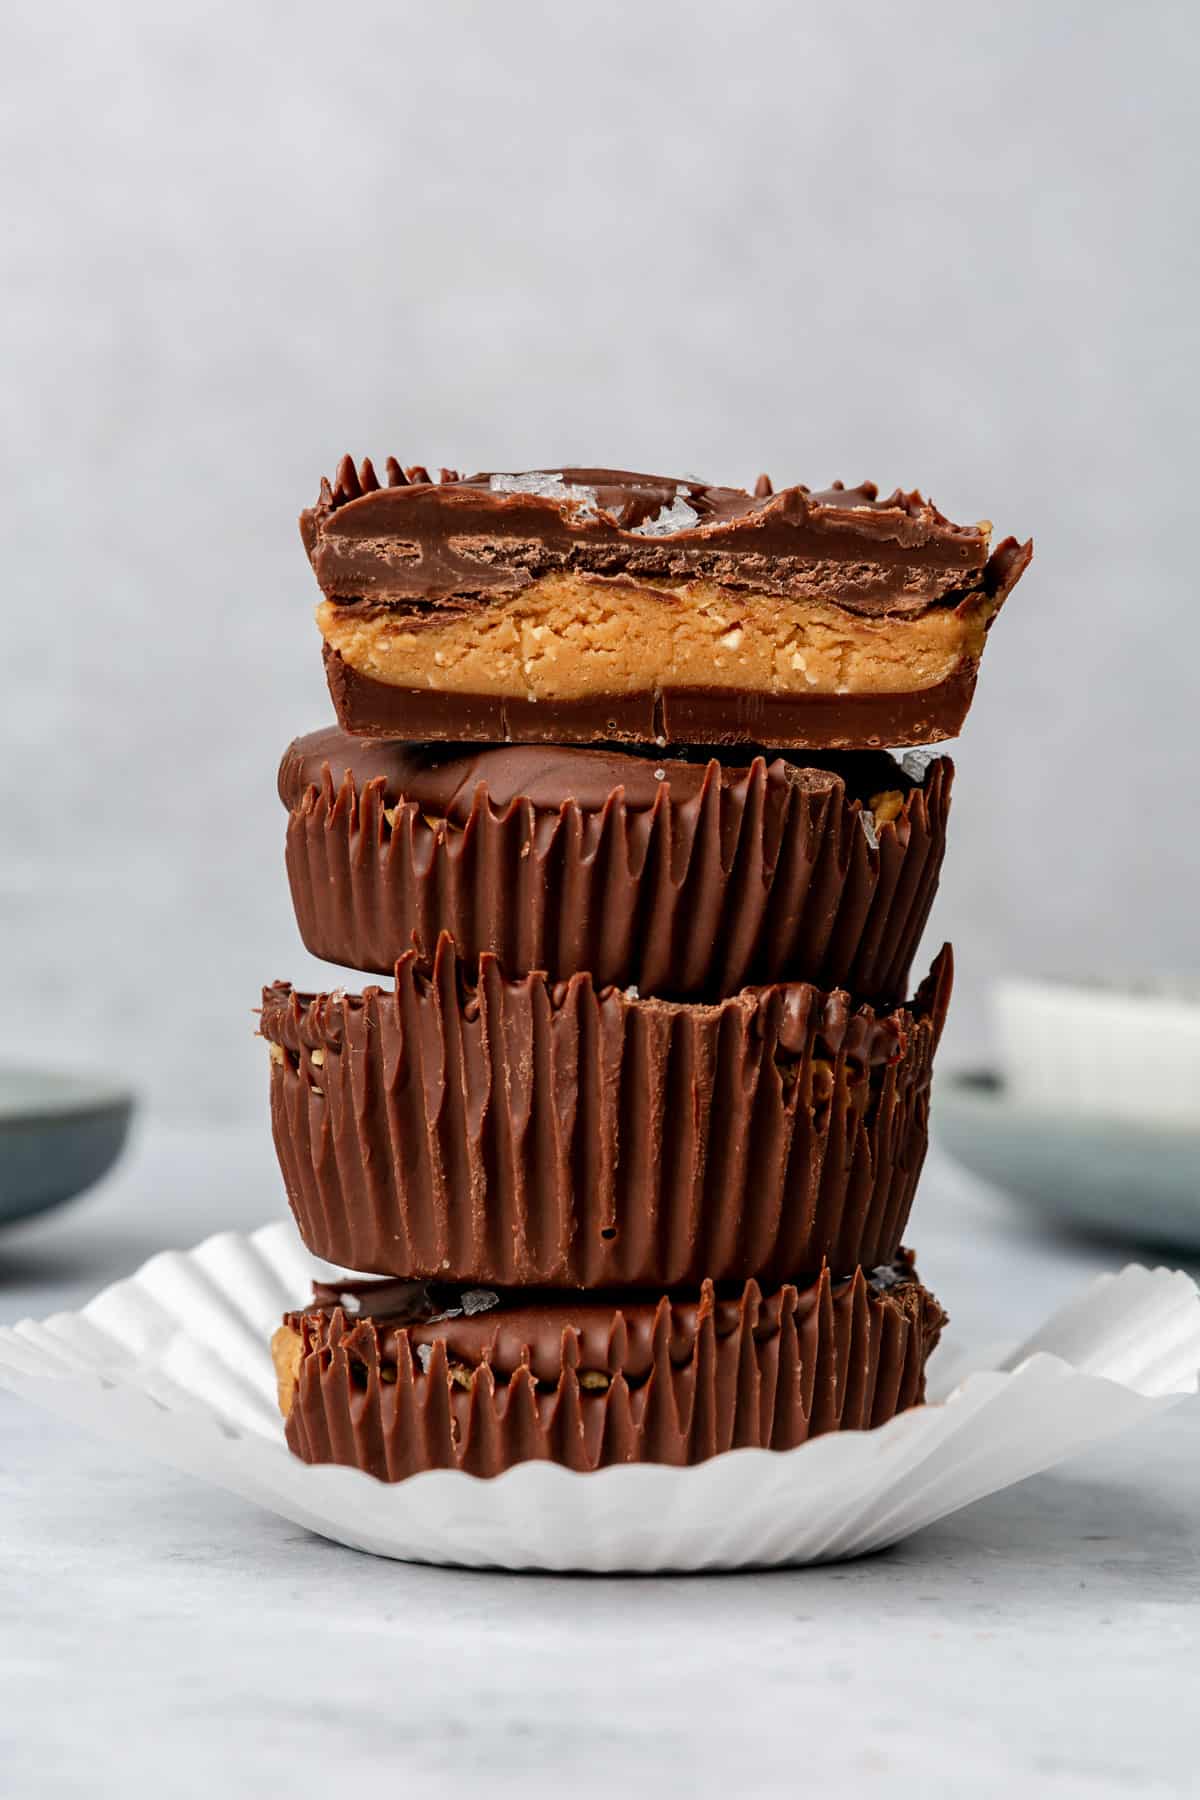
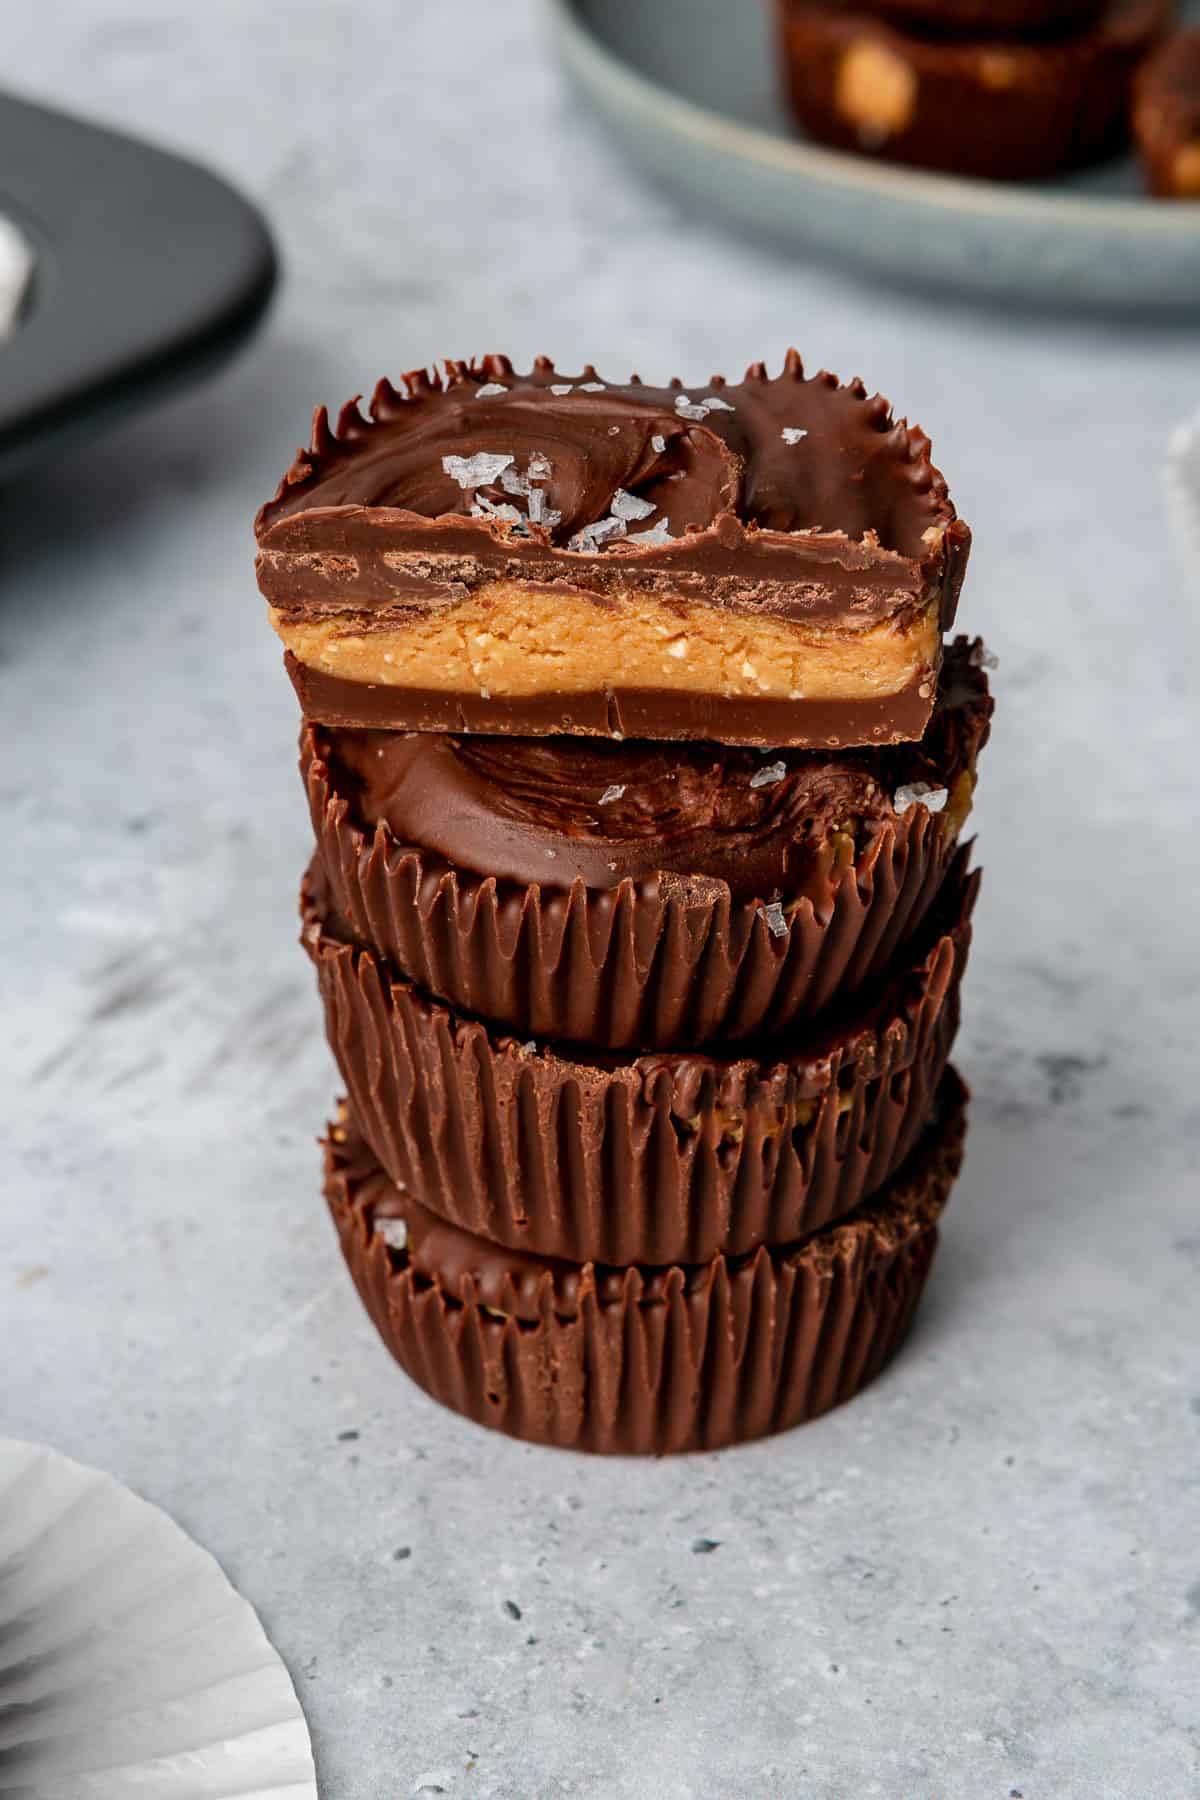
These peanut butter cups are so good! They’re made with melt-in-your-mouth chocolate and creamy peanut butter. All you need are four ingredients and a few minutes of hands-on time to layer each PB cup. I can’t wait to show you everything you need to know about making peanut butter cups from scratch!
Jump to Section
Creamy peanut butter and rich, sweet chocolate are an epic food combination, and for good reason–it’s a can’t-get-enough pair. And the combo tastes even better when you make these peanut butter cups yourself! Made with just a handful of wholesome pantry ingredients, you’ll love knowing exactly what goes into this peanut butter cup recipe. Keep them in the fridge for quick snacks and treats, or freeze them to make them last longer.
Recipe at a Glance
Cuisine Inspiration: American
Primary Cooking Method: Microwave
Dietary Info: Vegetarian, Gluten Free
Key Flavor: Chocolate & peanut butter
Skill Level: Easy
Summary
- Family friendly: Peanut butter cups are a universally loved candy. The whole family will love the homemade version, from little ones to age 99+!
- Simple list of ingredients: We’re talking 4 ingredients! Just chocolate chips, peanut butter, pure maple syrup, and a little sea salt (if you like).
- Easy to make: The hardest part of making this recipe is waiting for the peanut butter cups to set!
- Versatile recipe: Make peanut butter cups with dark chocolate, milk chocolate, or even white chocolate! Use creamy or crunchy peanut butter, or add in some extras. This peanut butter cup recipe is easily customizable!
Ingredients to Make Peanut Butter Cups
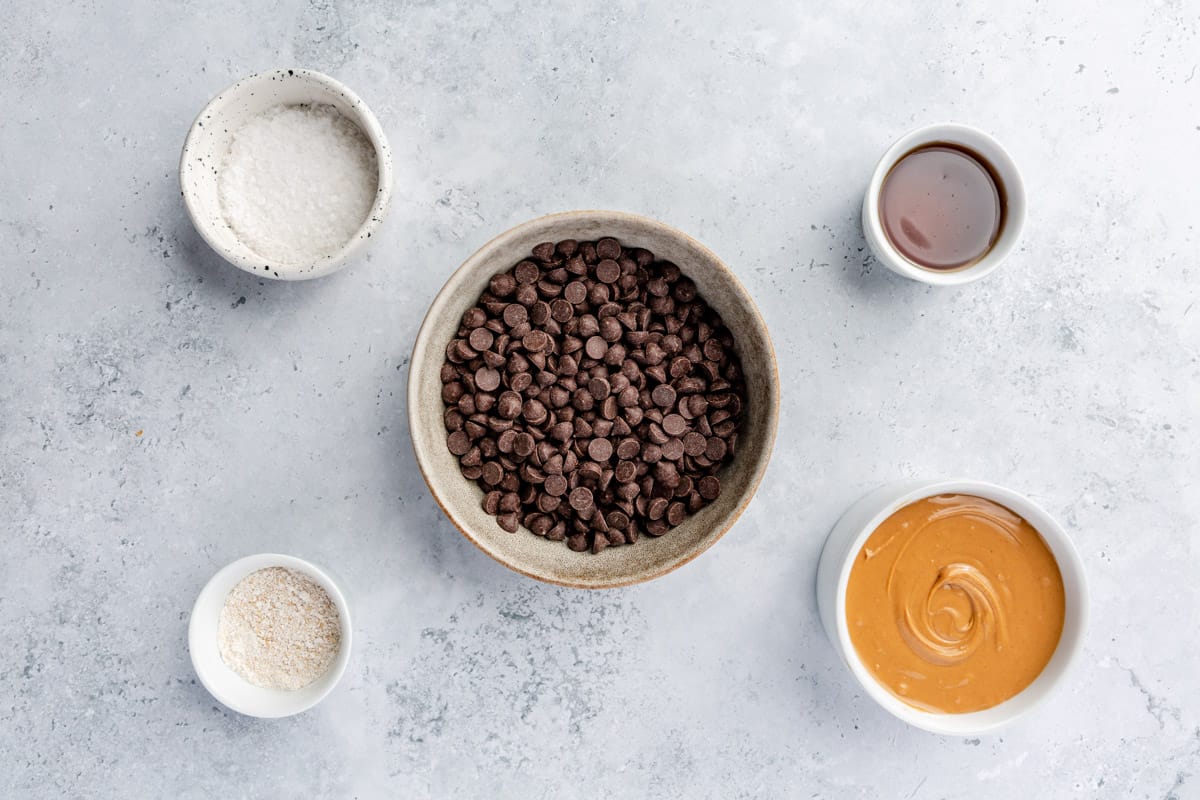
- Semi-sweet chocolate chips: Use your favorite brand of semi-sweet chocolate chips.
- Peanut butter: I suggest a natural no-stir creamy peanut butter.
- Pure maple syrup: The touch of sweetness makes these peanut butter cups taste like the famous store-bought versions. Feel free to adjust to your preference.
- Oat flour: This is optional, but helps to thicken up the peanut butter filling a bit if you’d like.
- Flaky sea salt: Also optional, but highly recommended, for garnish. Go with a finishing salt such as Maldon or fleur de sel.
Popular Substitutions & Additions
- Dairy-free/vegan: Opt for dairy-free chocolate chips.
- Add jam: Top the peanut butter layer filling with a teaspoon of your favorite preserves for a PB&J cup.
- Switch out the peanut butter: Sub creamy almond butter, cashew butter, or sunflower seed butter for the peanut butter.
- Top with a pretzel: After spreading the top layer of chocolate onto your peanut butter cups, lightly press a mini pretzel on top and let harden. The salty crunch is so good on these peanut butter cups!
- Add marshmallow creme: Spread a layer of marshmallow creme on the bottom chocolate layer before adding your peanut butter. Sprinkle the tops with graham crackers crumbs and you’ve got S’more peanut butter cups!
How to Make Peanut Butter Cups
Making peanut butter cups from scratch is simple! It’s just a matter of melting the chocolate, mixing up the peanut butter filling, and layering the ingredients in lined muffin tins. While the hands-on time is minimal, be sure you allow time for firming up between each step.
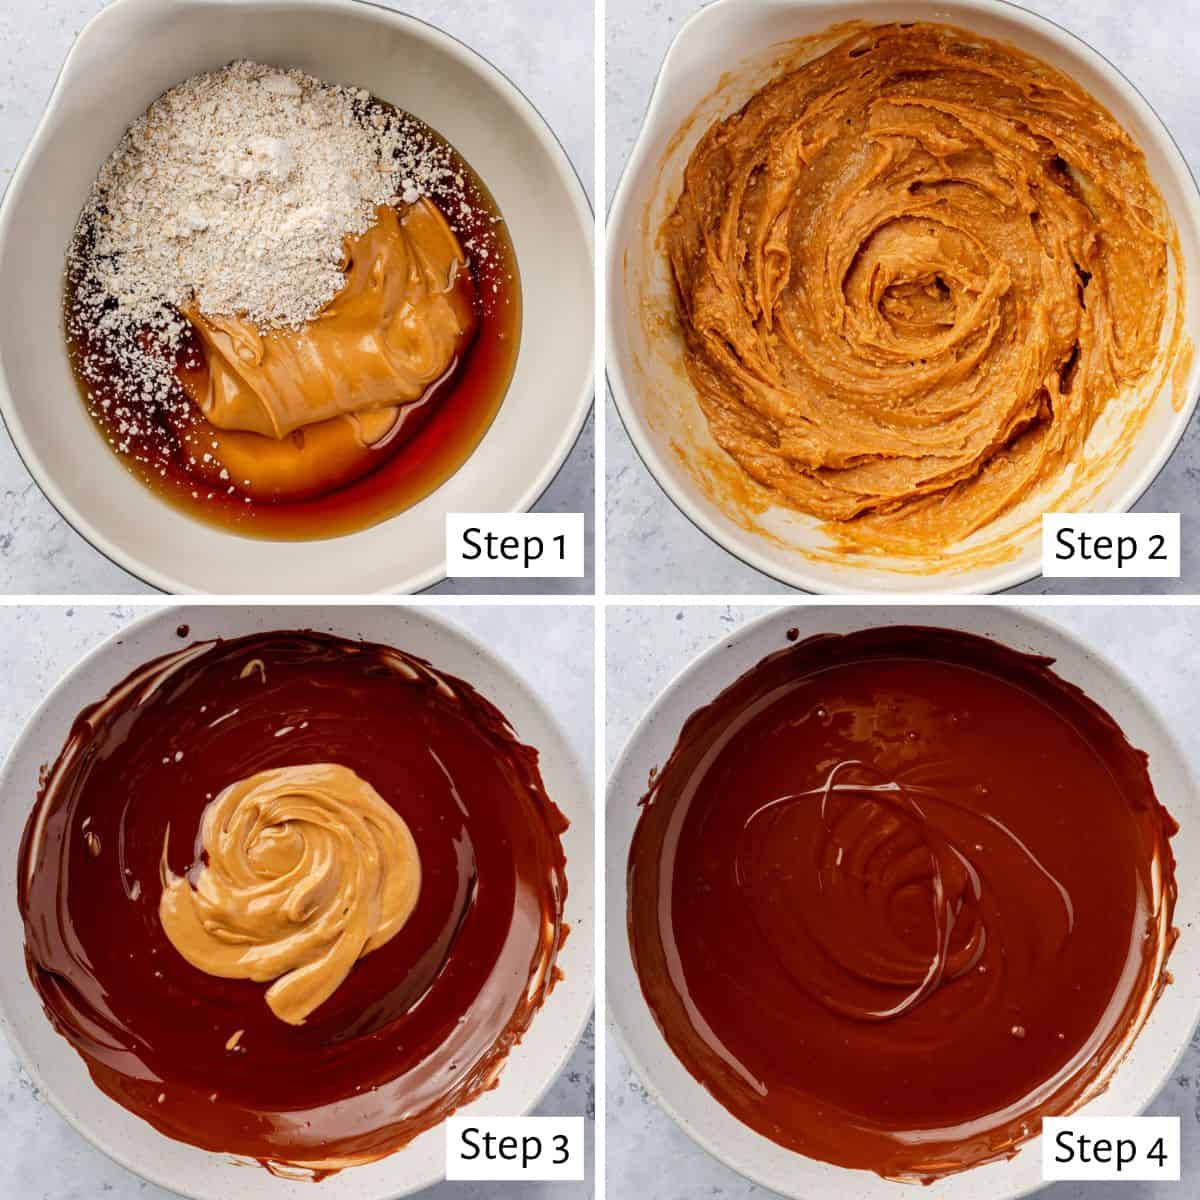
Prepare the Peanut Butter Filling and Chocolate Shell
- Add the peanut butter, oat flour (if using), and pure maple syrup to a bowl.
- Stir together until smooth and set aside.
- In a microwave-safe bowl, melt the chocolate chips. Add the peanut butter.
- Stir until smooth.
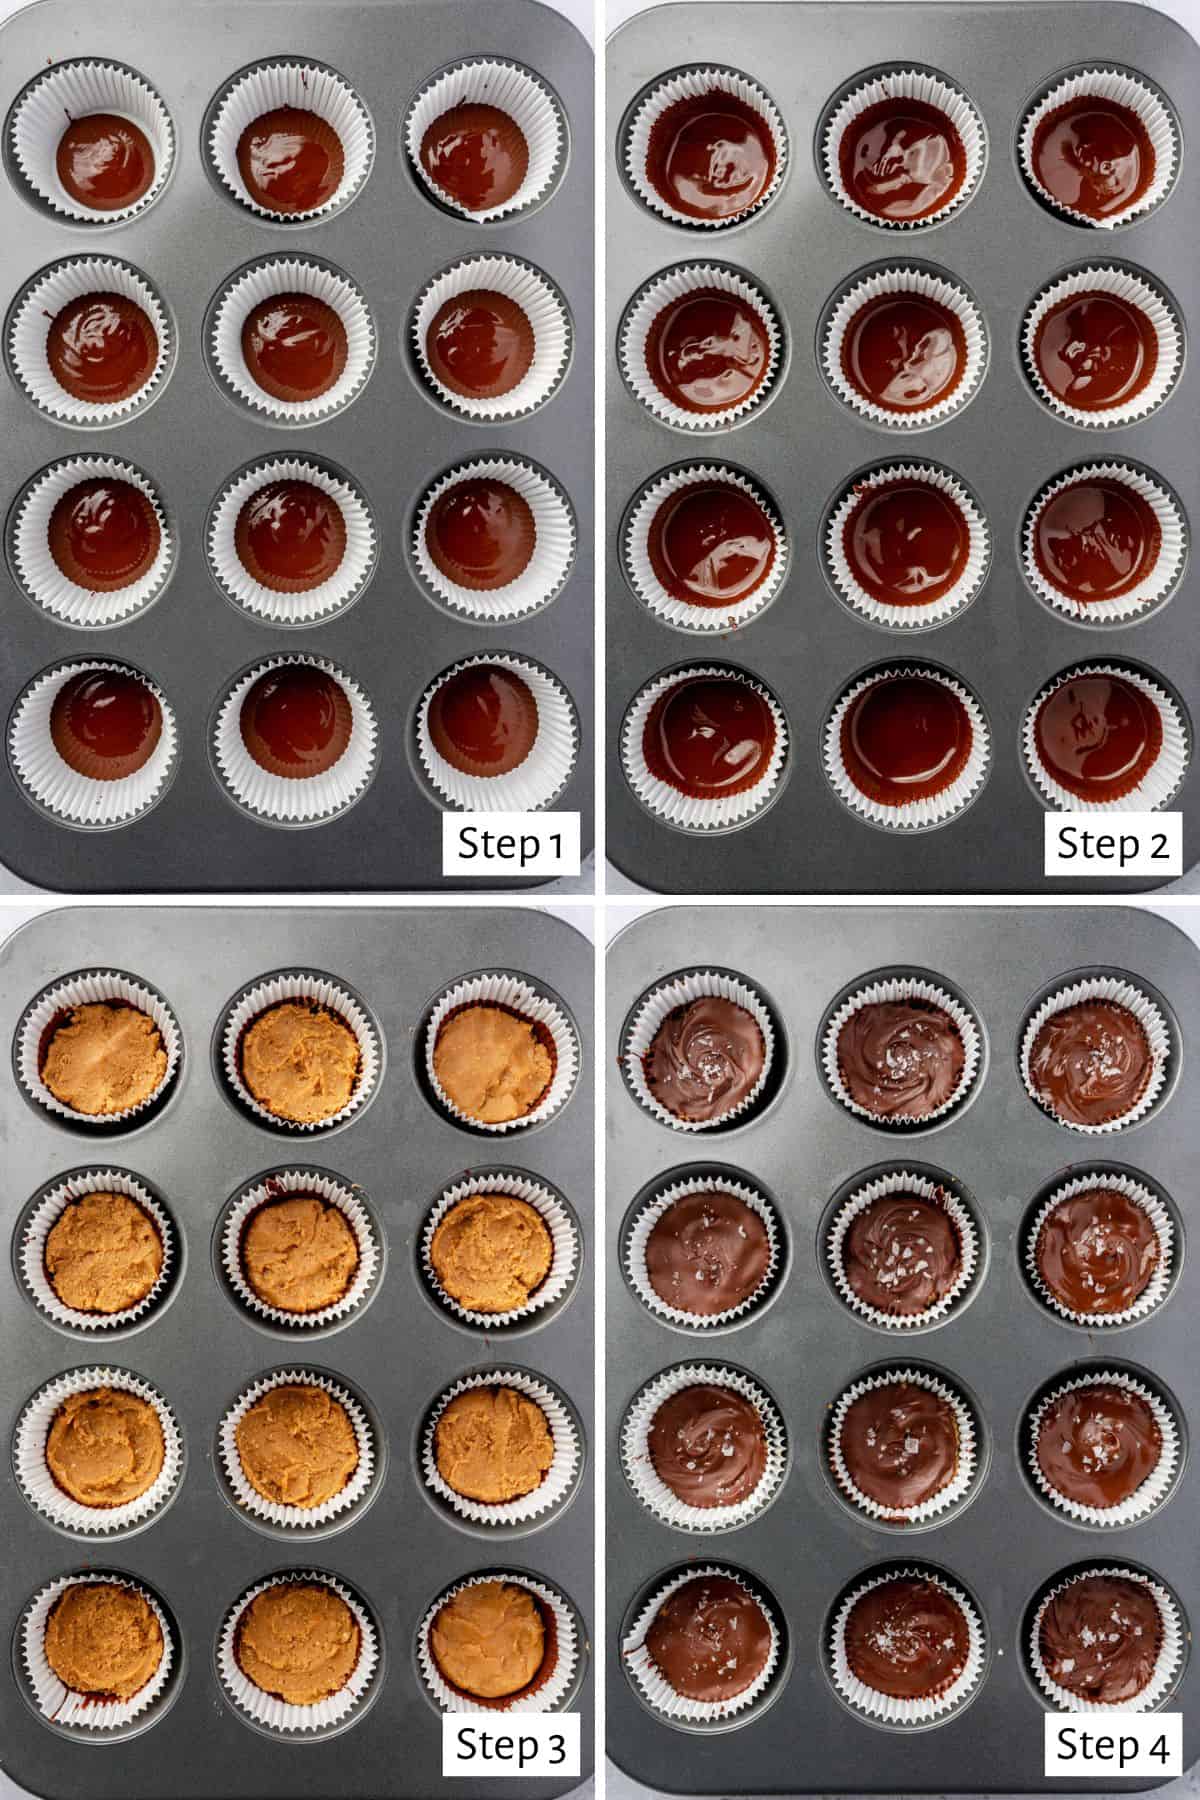
Fill the Muffin Tin
- Line a muffin tin with paper muffin liners. Add some melted chocolate to each muffin liner.
- Use a silicone brush or a spoon to spread the chocolate partway up the side of the liner and smooth the bottoms of the cups into an even layer. Place in the freezer until firm.
- Spoon some of the peanut butter filling into the hardened chocolate cups. Smooth the top of the peanut butter and return to the freezer to firm up.
- Divide remaining chocolate between the cups, covering the peanut butter and smoothing the tops. Sprinkle with flaky salt (if using). Freeze until hardened.
Tips for Making the Best Homemade Peanut Butter Cups
- Take care when melting your chocolate. It’s easy to melt chocolate in the microwave, but there are a couple of steps for success. Make sure you use a dry, microwave-safe bowl. Heat the chocolate in 30-second increments and stir with a dry spoon in between each interval, just until the chocolate chips are almost melted, then continue stirring until they’ve melted all the way. Here are more tips for melting chocolate.
- Use an offset spatula. If you have one, use an offset spatula to spread and level the chocolate and peanut butter. This handy little tool makes it much easier!
- If adding sea salt, sprinkle it on while the chocolate is still melted. This will help it adhere to the top of your peanut butter cups.

How to Store Peanut Butter Cups
It’s best to store homemade peanut butter cups in an airtight container in the refrigerator. This will help keep the chocolate from melting.
How Long Will Peanut Butter Cups Last in the Fridge?
They will last up to 5 days in the refrigerator.
Can I Freeze Peanut Butter Cups?
Yes! To freeze peanut butter cups, place them in an airtight container and place them in the freezer. They will keep for up to 1 month. Thaw at room temperature for a few minutes and they’re good to go!
Frequently Asked Questions
The chocolate chips could have gotten wet, or it could have burned. Make sure your bowl and spoon are bone-dry before starting. Any water can cause the chocolate to seize up when melting. Also, make sure you’re only microwaving it in 30-second increments, then stirring, and err on the side of less time in the microwave vs. more. The last bit of melting will happen during the stirring.
Absolutely! I recommend using muffin liners either way, though.
Yes, you can use agave syrup, honey, or powdered sugar in place of the maple syrup.
With a surprisingly short list of ingredients and a few minutes prep time, you’ll love how easy it is to make homemade peanut butter cups! Customize this recipe exactly how you like them, or try the recipe as-is (I highly recommend the sea salt!) Either way, I think you’ll love peanut butter cups from scratch!
More Chocolate Peanut Butter Dessert Recipes:
- No-Bake Chocolate PB Bars
- Peanut Butter Chocolate Dip
- Chocolate-Dipped PB Cookies
- Peanut Butter Date Bark
- Chocolate PB Banana Bread
- Hershey Kiss Cookies
- Chocolate PB Eggs
- Date Snickers “Bars”
If you try this feel good Peanut Butter Cups recipe or any other recipe on Feel Good Foodie, then don’t forget to rate the recipe and leave a comment below! It helps others who are thinking of making the recipe. We would love to hear about your experience making it. And if you snapped some shots, share it on Instagram so we can repost on Stories!

Peanut Butter Cups
Ingredients
For the Chocolate Layers
- 1 ¼ cups chocolate chips
- ¼ cup creamy peanut butter
For the Peanut Butter Layer
- ¾ cup creamy peanut butter
- 2 tablespoons oat flour optional
- ¼ cup maple syrup
- Flaky salt optional, for garnish
Instructions
- Line a 12-cavity muffin tin with paper muffins liners and set aside.
- Place the chocolate chips in a medium microwave-safe bowl, melt in the microwave using 30-second intervals until the chocolate is fully melted. Add ¼ cup peanut butter and whisk to combine.
- Add about 2 teaspoons of melted chocolate mixture to each muffin liner. Use a silicone pastry brush or the back of a spoon to spread the chocolate about ⅓ of the way up the muffin liner to form the base of the chocolate cup. Make sure the bottoms of the cups are smoothed into an even layer, then place in the freezer to firm up for 10 minutes.
- While the chocolate sets up, in a medium bowl, combine ¾ cup peanut butter, oat flour (if using), and maple syrup until smooth. When the chocolate is firm, place 1 tablespoon of peanut butter into each chocolate cup. Use an offset spatula to smooth the peanut butter into a single layer. Place in the freezer to firm up for 10 minutes.
- Add about 2 teaspoons of the remaining chocolate on top of each chocolate cup. Use the back of a spoon to spread the chocolate into an even layer. Sprinkle the tops with flaky salt (if desired), then place back in the freezer for an additional 10 to 20 minutes.
Notes
Nutrition
Nutrition information provided is an estimate. It will vary based on cooking method and specific ingredients used.


Comments
is there a substitition for oat flour?
You could also use almond flour, or just skip the oat flour.