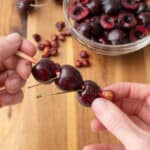
How to Pit Cherries
This is a simple tutorial to show how to pit cherries 4 ways. Learn the easiest way to pit cherries, with and without a knife!
Servings: 1.5 servings
Equipment
Ingredients
- 1 pound cherries stems removed
Instructions
Poke Method
- Hold the cherry with the stem side facing up. Place a straw, chopstick or thin pastry tip on the stem side. Firmly but carefully push through the tip straight down until the pit pops out from the bottom. You can also place the cherry on the top of an empty bottle with a narrow opening, instead of between your fingers.
Slice and Twist Method
- Hold the cherry with the stem side facing up. Use a paring knife to cut around the cherry lengthwise, rotating the cherry as you cut around. Twist the two cut cherry halves, then remove the pit with your fingers.
Tear Method
- Hold the cherry with the stem side facing up. Place your thumbs on the stem side and your index fingers on the opposite side. Firmly but carefully pull the cherry apart, ripping it half. Remove the pit with your fingers.
Press Method
- Place the cherry on a cutting board. Use the flat side of a paring knife to press down on the cherry firmly but carefully. This will loosen the pit and then you can remove the pit with your fingers.
Notes
Storage: Store pitted cherries in an airtight container in the fridge for up to 4 days. You can also freeze them for future recipes. Simply spread the pitted cherries in a single layer on a baking sheet and freeze until firm. Once frozen, transfer them to a freezer-safe ziptop bag and freeze for up to 3 months.
Tips:
Use a bottle. If using the poke method, consider placing the cherry on the top of an empty but sturdy bottle with a narrow opening, instead of between your fingers. The pit will pop directly into the bottle.
Chill cherries before pitting. Pop your cherries in the freezer for about 10 minutes before pitting them. This will firm them up slightly, making them easier to handle without squishing.
Wear kitchen gloves. To prevent your hands from getting stained by cherry juice, wear disposable kitchen gloves.
Keep the tools clean. If you're pitting a large amount of cherries, keep a bowl of water or a damp cloth nearby to keep your straw, chopstick, or knife clean. This will help prevent cherry residue from building up.
Nutrition
Serving: 1cup | Calories: 191kcal | Carbohydrates: 48g | Protein: 3g | Fat: 1g | Saturated Fat: 0.1g | Polyunsaturated Fat: 0.2g | Monounsaturated Fat: 0.1g | Potassium: 671mg | Fiber: 6g | Sugar: 39g | Vitamin A: 194IU | Vitamin C: 21mg | Calcium: 39mg | Iron: 1mg
QR code
Scan code to view the full recipe on your phone.
