This post may contain affiliate links. Please read our disclosure policy.
This post on How to Make a Cheese Board is sponsored by Roth Cheese. As always, all opinions are my own ?
If you’re wondering how to make an epic cheese board, check out my tutorial below for easy steps. I’ll share everything you need to create a beautiful cheese board or plate with minimal time and effort, along with inspirational ideas and ingredients. Cheese boards are perfect for parties, holiday entertaining or simple get-togethers.
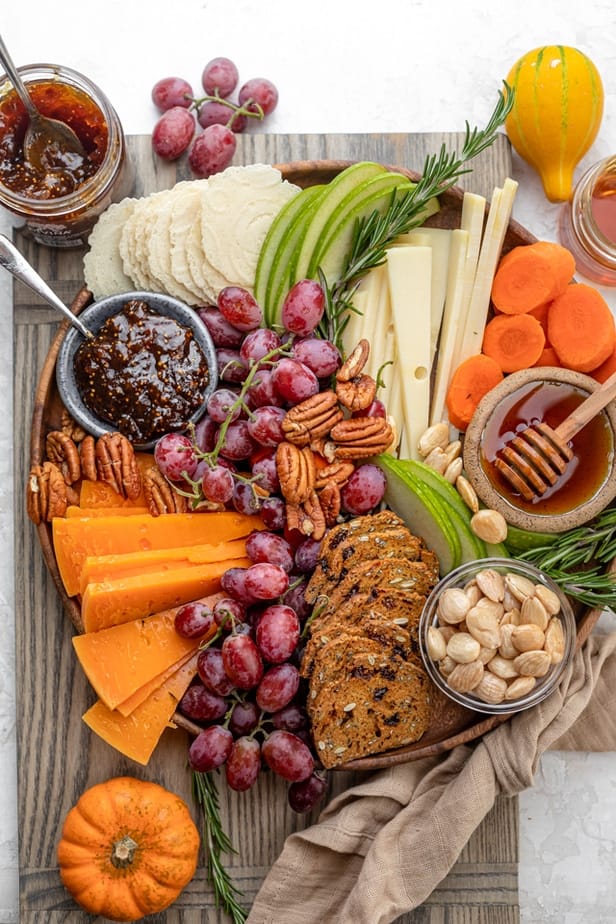
Table of Contents
What to put on a cheese board
If you’re looking for cheese board ideas for what to include, the good news is you really can’t go wrong with any choices. I’ll include some guidelines below you can follow, but feel free to add other items you like and foods that your guests would enjoy munching on with cheese.
Cheese – must have!
I recommend using at least two types of cheese. It’s always a good idea to use something that most guests are familiar with and another that is new and exciting. It creates a great conversation piece and allows guests to try something new. Here are popular cheeses you can include in building your cheese board. Serve cheese at room temperature.
- Hard cheese: Parmesan, Cheddar, Asiago, Pecorino.
- Semi-hard cheese: Gruyere, Gouda, Emmentel, Manchego, Fontina, Provolone, Swiss.
- Semi-soft cheese: Fontina, Havarti, Gorgonzola, Blue.
- Soft cheese (spreadable): Burrata, Mozzarella, Brie, Feta, Goat.
Fruits and Vegetables
Look for fruits and vegetables that are seasonal or would complement the flavors you’re going for. You can also choose based on colors or based on a theme, for example a Mediterranean cheese board with cucumbers, tomatoes and pomegranates. This is a quick way to add crunch and color to the cheese board. Here are some popular choices:
- Fruits: Grapes, apples and pears (toss in lemon juice to keep from browning), peaches, oranges, strawberries, blueberries, raspberries, cherries, plums, figs, olives.
- Vegetables: Cucumbers, carrots, cauliflower, broccoli, celery, parsnips, peppers, mushrooms, radishes tomatoes, pickled vegetables.
Bread and crackers
Think of this as what you’ll be serving the cheese on – the obligatory carb for the cheese. There are so many ideas you could try, and grocery stores will often stock specialty crackers just for pairing with cheese. But there’s no need to go fancy with it. Here are some popular ideas you can try.
- Bread: Toast, crostini, baguette, croutons, breadsticks.
- Crackers: Water crackers, sesame, cheese, grain, whole wheat, mazo.
- Others: Pretzels, popcorn, chips, parmesan crisps.
Accompaniments
This is where you get to have fun with it and add unique items to fill the gaps between the cheese, bread, fruits and vegetables. Yes, chocolate is totally acceptable on a cheese board!
- Nuts: Almonds, pecans, walnuts, hazelnuts, pistachios or try my honey roasted cashews.
- Spreads: jam, jelly, preserves, chutney, tapenade, honey.
- Chocolate: Chocolate bars, chocolate covered nuts, chocolate chips.
- Dried Fruit: Apricots, figs, dates, raisins, cranberries, crystallized ginger.
- Dips: Pesto, hummus, guacamole, salsa.
- Charcuterie: Smoked meats, cured meats, roasted meats.
- Greens (for garnish): Rosemary, thyme, oregano, arugula, kale.
Recipe at a glance
Cuisine Inspiration: International
Primary Cooking Method: Assembly
Dietary Info: Customizable to dietary needs
Key Flavor: Varied – From creamy to sharp cheese
Skill Level: Easy
Summary
- Diverse Cheese Selection: Enjoy and explore a range of flavors from creamy brie to sharp cheddar.
- Perfect Pairings: We combine tasty cheeses with fruits, nuts, vegetables, and herbed crackers for a complete tasting experience.
- Customizable for all diets: Easily adaptable to include vegan, gluten-free, and even dairy-free options.
- Impressive Presentation: Learn how to artfully arrange your cheese board for maximum visual appeal.
How to assemble a cheese board
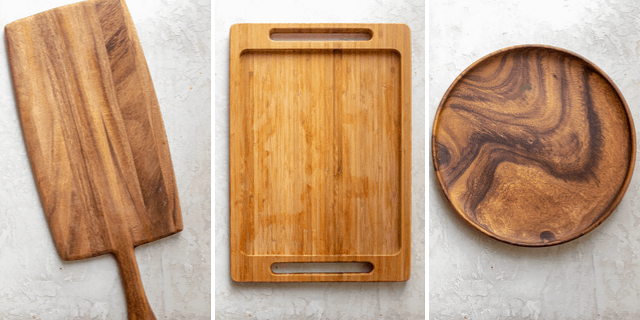
1. Pick a board
This will depend on the size of the party you’re making the cheese board for and if you’re in the mood for something round, square or rectangular. Popular types of boards are wood, marble or slate. If you’re using any soft cheese, it’s also a good idea to have some small cheese knifes, or butter knives will work too.
You don’t necessarily have to even buy a cheese board. You can use any large flat platter as a cheese board. You can even use a cutting board or cookie sheet. Once all the cheese and accompaniments are on top, no one will even notice what it’s served on.
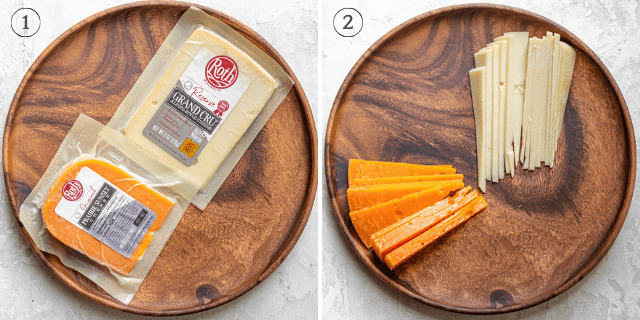
2. Lay out the cheeses you’ll be using
The cheese is the star of the cheese board, so you’ll want to pick a number suitable for the size of the cheese board and try to separate them on the platter so they’re not right next to each other. I’m using two Roth Cheese favorites: Grand Cru (which is similar to a gruyere) and Prairie Sunset (which is similar to a sharp cheddar).
Grand Cru is an Alpine-style cheese that is very unique in the U.S. It has floral notes with nutty undertones, a hint of fruitiness and a mellow finish. Look at me all talking cheese notes now!
Prairie Sunset is a Wisconsin Original cheese which often described as a “cheddar-gouda” blend. It has a mild, sweet and approachable flavor that makes it versatile for snacking, cooking and entertaining.
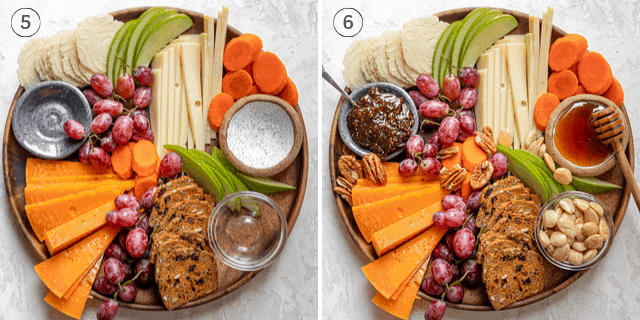
3. Add fruits/vegetables and pinch bowls if using
Add any fruits and vegetables you’re using. This is also a good time to distribute some pinch bowls so there’s space for them on the cheese board. These pinch bowls are perfect for jams, honey, dips or even nuts. Plus, their height and shape break up the cheese board to make it more visually interesting.
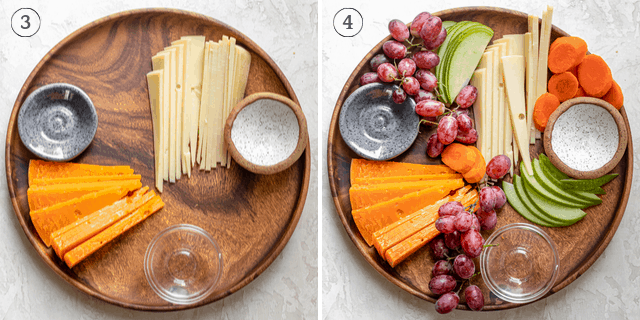
4. Fill gaps with accompaniments
This is the fun part when you can fill in the gaps with crackers, breadsticks and nuts! It’s a good idea to fan out crackers or vegetables on the cheese board so it’s easier for guests to grab one piece at a time. Nuts are great for adding towards the end because they add texture and help fill up any small open spots on the board.
Keep in mind having a balance of sweet and salty ingredients, and distributing colors evenly around the board. The goal is to show abundance and fill the gaps. I used mostly orange, purple and a pop of green in my fall cheese board to play on the autumn harvest theme.
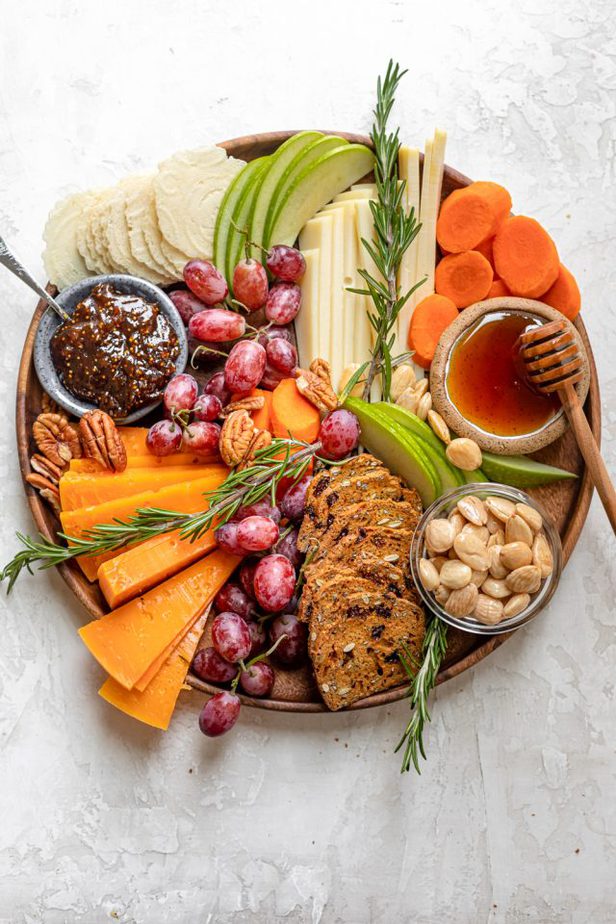
5. Finish with greens
This is my favorite way to finish off a beautiful cheese board. I use whatever greens are in season. Most cheese boards are filled with yellow, white and brown colors. So, the greens really break up those colors and add a gourmet element to the board. I chose rosemary to complement the fall theme.
Tips for how to making the best cheese board
- Use a flat surface as the cheese board. It doesn’t have to be an actual cheese board. You can use any platter, cutting board or even bake sheet as long as it doesn’t have curved edges. You want to be able to set items without them sliding when other items are removed.
- Serve cheese at room temperature. If you prepare the board in advance, make sure to let the cheese sit out for 30 minutes before serving.
- Prep the cheese board in advance to save time. You can prep everything a few hours in advance and just cover it with a plastic wrap or beeswax wrap. If you’re using nuts or greens though, it’s best to add those immediately before serving to preserve freshness.
- Keep the cheese board fresh by replenishing often. Keep extras of everything on the cheese board so you can easily fill the gaps as guests eat certain items. I usually know which items will be especially popular and stock up on those.
How to store a cheese plate
To store cheese, place wax paper around it and then cover the wax paper with plastic wrap. I would not recommend vacuum sealing any leftovers since it may create mold if not done properly.
How long will a prepared cheese board last in the fridge?
Most cheeses on your board can last between 3 to 7 days in the fridge. Hard cheeses will last longer than soft cheeses, so depending on what you’ve put on your board could determine how long it will last in the fridge. Best practice is to wrap or repackage the cheeses when storing to avoid drying out or absorbing other flavors of the fridge.
Frequently asked questions about cheese boards
You can use small chalkboard signs or little toothpick flags that have display the names of the cheeses. Use a decorative washi tape and marker to label cheese knives, this is helpful in keeping one cheese knife per kind of cheese. If you’ve chosen a slate board, you can write directly on the board with a chalkboard marker. There are so many creative ways to label your boards, this is only just a few. I can’t wait to see what others you’ve come up with!
There are varying guidelines around this, but in general 3-4 ounces per person is a good general rule. This may also depend on what other appetizers you’re serving and what other accompaniments you’re including on the cheese board.
This will come down to preference. If you’re working with a whole cheese wheel, the two preferred methods are to cut into wedges or to do pie cut. If you’re working with a rectangle or square piece of cheese, then you can slice them thinly or cut into cubes. Offering a variety of shapes and sizes will make your cheese board more visually interesting.
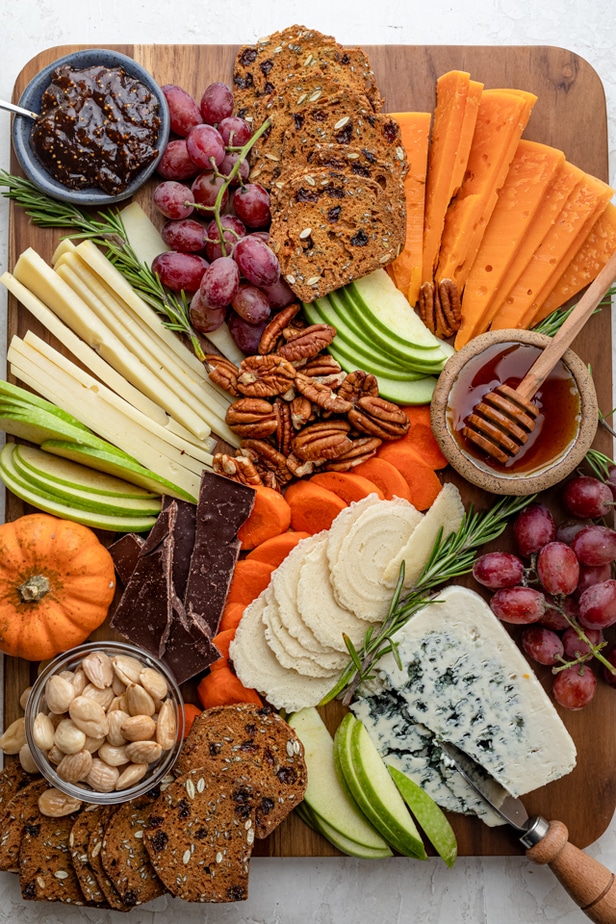
Crafting a cheese board is much more than just arranging a selection of cheeses on a platter. It’s an artful expression that brings together a collection of flavors and textures into an interactive dining experience. Guaranteed to be loved by everyone who is around to snack on your cheese plate! Plus, who’s ever had a bad experience snacking on cheese with friends?
Recipes with cheese:
- Cheese Stuffed Shells
- Grilled Cheese Sandwich
- Bake Macaroni and Cheese
- Broccoli and Cheese Soup
- Baked Brie Recipe
- Focaccia Charcuterie Board
If you use this guide for How to Make a Cheese Board, please be sure to leave a comment and/or give this recipe a rating! I would love to hear about your experience making it. And if you snapped some shots of it, share it with me on Instagram so I can repost on my stories!
preorder MY book
The Feel Good Foodie Cookbook is now available everywhere books are sold!
Amazon Barnes & Noble Books A Million Hudson Booksellers BookshopSCHULER Books (SIGNED)

How to Make a Cheese Board
Ingredients
- 6 ounces Roth Cheese Original Grand Cru sliced
- 6 ounces Roth Cheese Prairie Sunset sliced
- 3 cups grapes
- 1 carrot sliced
- 1 apple sliced
- 1/3 cup Marcona almonds
- 1/3 cup raw pecans
- 1/4 cup fig jam
- 1/4 cup honey
- 3 sprigs Rosemary for garnish
- 4 ounces package rosemary artisan crackers
- 4 ounces package toasted crisps
Instructions
- Arrange the sliced cheese around the board keeping space between them.
- Add in small pinch bowls or dishes to be filled with jam, honey and nuts.
- Place the fruits and vegetables around the cheese and pinch bowls layering them so they're easy to remove from one another.
- Place the crackers around the fruits and vegetables, stacking them high or fanning them out. There may be extra depending on the size of your board.
- Fill in the gaps with the Marcona almonds, pecans and any other accompaniments you'd like to add. Garnish with greens. Enjoy!
Notes
Nutrition
Nutrition information provided is an estimate. It will vary based on cooking method and specific ingredients used.
A Look At My Cheese immersion tour
Last month, I visited Wisconsin with Roth Cheese to learn what goes into cheesemaking, how the cheese category has evolved in the U.S. and get inspired to create new recipes with cheese. And we also had a work session on how to make a cheeseboard, which is what inspired this recipe post today.
Dairy farmers visit
It all starts on a farm. Roth Cheese is handcrafted in Wisconsin, and the cheese is sourced from 152 dairy farms within a 60-mile radius of the creamery. 90% of Wisconsin farms are family-owned, so there is the presence of strong sustainable dairy farming, which produces high quality 100% rBST-free milk to make cheese. I love that Roth only uses local fresh milk, and how hands-on they are in every step of the process!

Roth Cheese creamery visit
Along with other bloggers and food writers, I had the privilege of visiting the Roth Cheese creamery – my first time watching cheese being made behind the scenes. It’s a very hands-on approach where the cheese makers are constantly flipping cheese, testing bacteria levels and essentially creating 24 different cheese recipes.
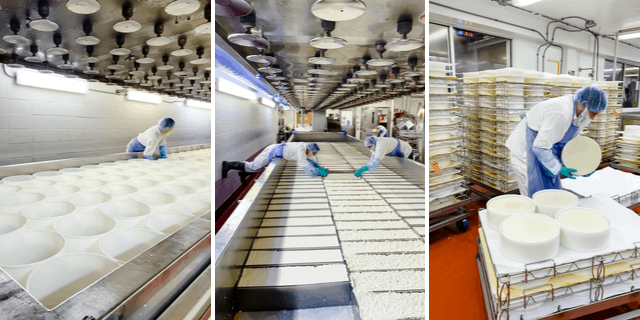
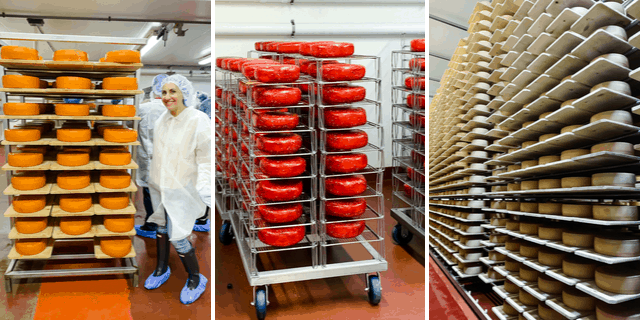
We also had a chance to visit the cellars to see how the cheese gets sealed, stored and aged as necessary. The cheese cellar that holds their popular Grand Cru cheese holds 73,000 wheels of cheese that are frequently rotated and inspected.
We learned how to cut cheese and store cheese to preserve freshness. I had no idea there were so many techniques and tools for cutting cheese. One of the surprising facts I learned is that the older the cheese, the less lactose it contains. So, a 3-month aged cheese is basically lactose-free.
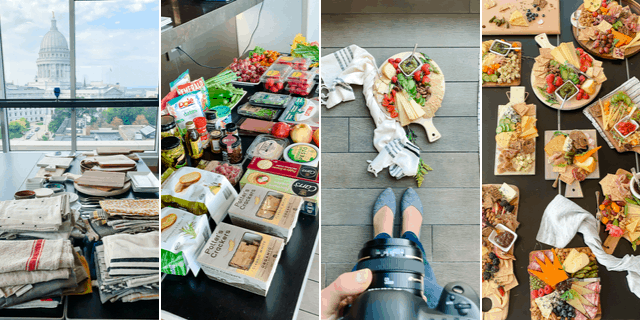
How to make a cheese board work session
Led by the Roth Cheese lead content developer, photographer and stylist, we had a hands-on session in learning how to build a cheese board, the elements that balance the cheese and the styling that makes it inviting. I learned that it’s about flavor, color, texture and storytelling. And it’s something that you get better at doing the more you do it.
Incorporating cheese in recipes and snacking
Every meal we had during the trip to Wisconsin with Roth Cheese included elements of cheese woven in the recipes, from salads, to frittata, to fondue and even desserts. Cheese consumption continues to rise in the U.S. The industry is growing with more types of cheese, and consumers more willing to experiment with cheese. But in the end, snacking on cheese remains to be one of the most popular ways to eat cheese. And what better way to snack than with a beautiful cheese board!

Great article
Thank you!
if you do not reply i will gang up with my friends and sue you. you idiot 🤢🤮🙄