This post may contain affiliate links. Please read our disclosure policy.
.Quinoa Pizza Crust Breadsticks are exactly what you think they are – pizza crust made from quinoa that you can top like a pizza or eat like breadsticks. Quinoa is naturally gluten-free, it’s packed with protein and it has twice as much fiber as most other grains! So this is a nutritious, healthy appetizer that everyone will love with less calories and carbs than traditional pizza dough.
How to make quinoa pizza crust
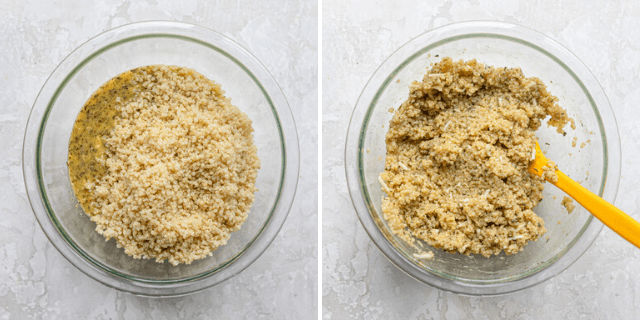
If you have the quinoa already cooked, all you need to do is whisk two eggs with olive oil, Italian seasoning, onion powder, garlic powder and baking powder. The onion powder and garlic powder give it that savory taste of breadsticks and the baking powder helps it fluff up. Then add the cooked quinoa and cheese, and combine.
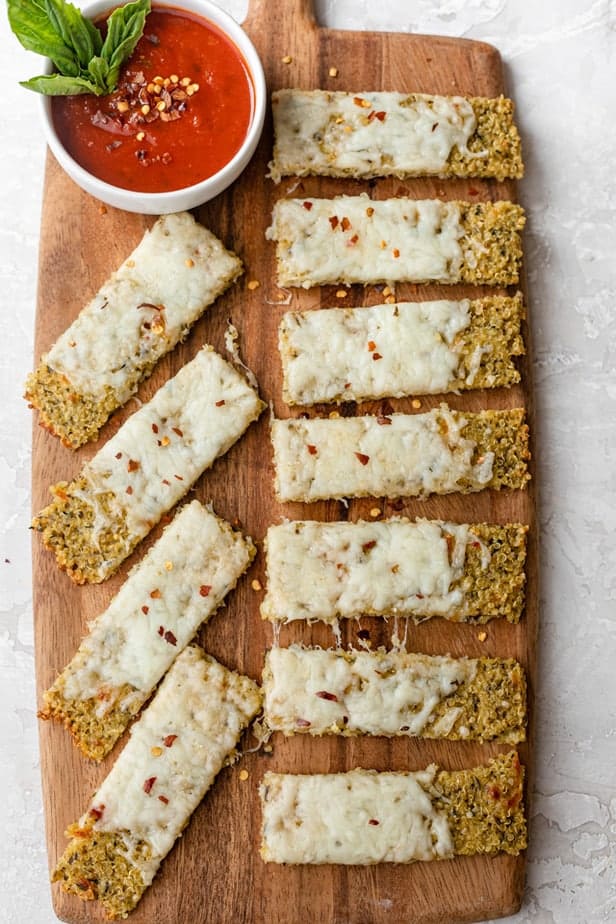
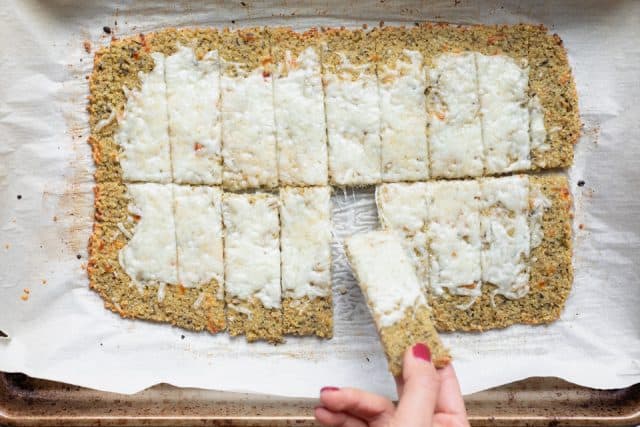
You can shape it however you’d like – round, oval, or even individual garlic bread style. Once the quinoa crust cooks in the oven and becomes golden and crisp, you can also top it however you’d like…cheese, pizza sauce, chicken and veggies…whatever you normally add for pizza toppings! I love making them into quinoa pizza crust breadsticks with a rectangular shape.
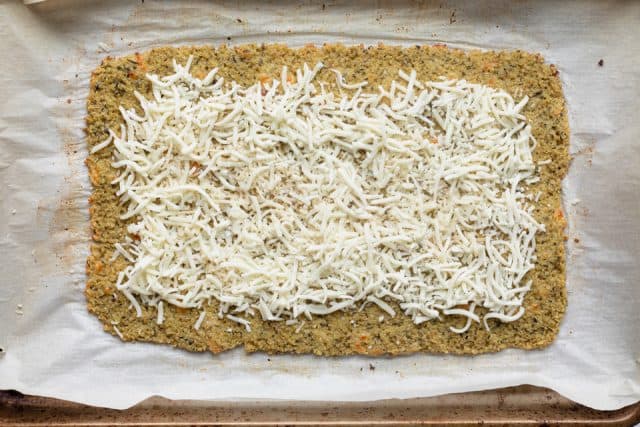
Once the mixture binds together and is fully cooked, add the cheese to the quinoa crust and return it to the oven just until the cheese melts. It will go from quinoa crust with cheese on to top of it to quinoa crust pizza breadsticks – your new favorite gluten-free pizza crust.
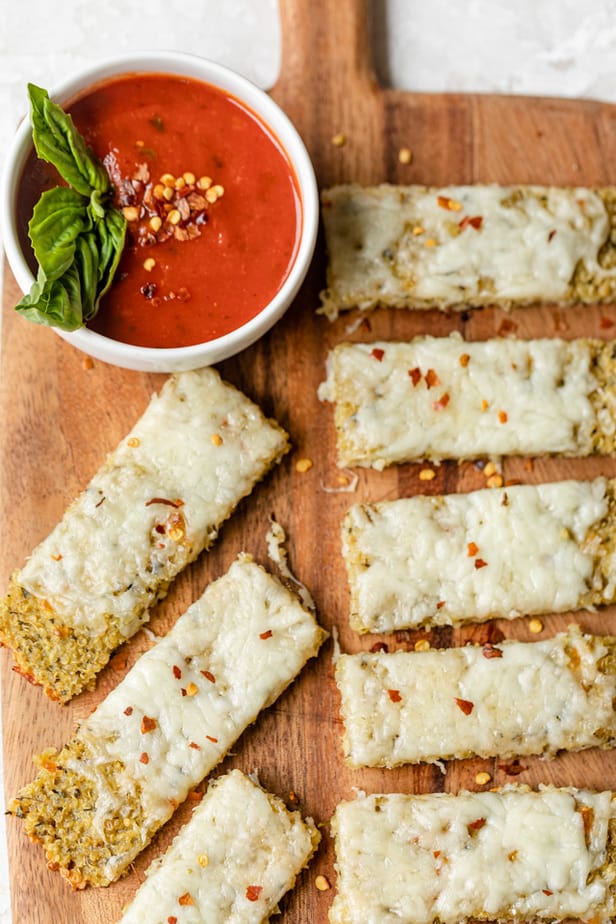
I like slicing it in half the long way and then making individual strips to mimic breadsticks. It’s much thinner than traditional breadsticks made with dough and the consistency is not the same. But I love the lighter option as a fun appetizer to switch things up!
This Quinoa Crust Cheesy Breadsticks makes a batch big enough for a party of 8. It’s surprisingly a real crowd pleaser, and no one will believe it’s made with quinoa! Serve it with marinara sauce, homemade ranch dressing, garlic sauce or any other dip you’d like!
Tips for making quinoa pizza crust breadsticks
- Remove any excess moisture from the cooked quinoa. I cook quinoa like cooking rice with enough water to become fully absorbed after cooking. However, if you cook it like pasta, you may need to drain out any excess moisture to avoid a soggy crust.
- Limit the toppings you add to the quinoa crust. While it’s tempting to load up on the toppings, I would recommend limiting the amount since the consistency of the crust is not as durable as that of pizza dough.
- Avoid any toppings with with high water content. This is includes tomatoes and zucchini, for example, which can release a lot of moisture when cooked. If you want to include those toppings, cook them separately and add when serving.
- Flip the crust before adding the toppings. This is not necessary, but will result in an extra crispy crust. Just be sure to use two spatulas for flipping to make sure it doesn’t fall apart.
Frequently asked questions
It may sound daunting to make your own pizza crust, but this gluten-free version is so quick and easy to make! It takes about 10 minutes to prep and then 15 minutes hands off time for it to bake in the oven. It’s so easy to make a big batch so it’s great if you are entertaining!
Unlike a traditional pizza dough, the great thing about this version is that you can make it and bake it straight away, meaning you can enjoy this appetizer without having to plan ahead. I prefer to serve these breadsticks straight out of the oven. If you like you can make the crust ahead of time and then top with cheese to reheat before serving. You can also mix the dough ahead of time and keep it covered in the fridge.
I love a traditional pizza dough as much as the next person, but it’s great to switch things up! This crust is wonderfully crispy and it has the slightest hint of nuttiness from the quinoa. Mozzarella is mixed into the crust for a wonderfully cheesy bite and the Italian seasoning adds a herby quality.
Easy quinoa recipes:
If you’ve tried this healthy-ish feel good Quinoa Pizza Crust Breadsticks recipe or any other recipe on FeelGoodFoodie, then don’t forget to rate the recipe and leave me a comment below! I would love to hear about your experience making it. And if you snapped some shots of it, share it with me on Instagram so I can repost on my stories!
This Quinoa Crust recipe was originally published on October 17, 2017. I’m re-sharing it today with more step-by-step photos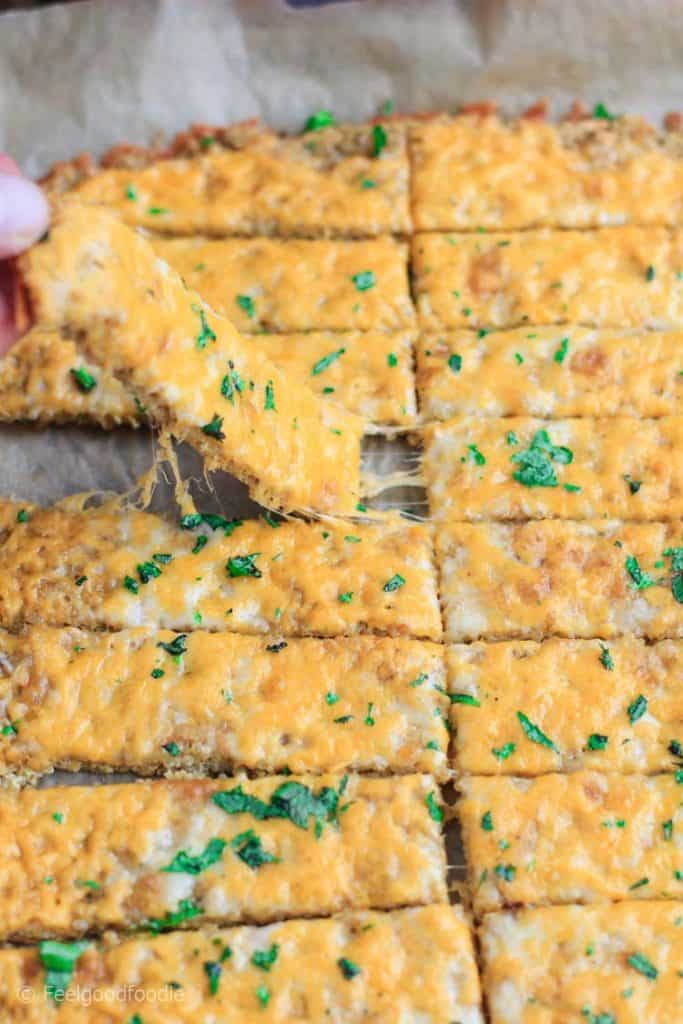
preorder MY book
The Feel Good Foodie Cookbook is now available everywhere books are sold!
Amazon Barnes & Noble Books A Million Hudson Booksellers BookshopSCHULER Books (SIGNED)
Quinoa Pizza Crust Breadsticks
Video
Ingredients
- 1 1/2 cup cooked quinoa
- 2 eggs
- 2 tsp olive oil
- 2 tsp Italian seasoning
- 1 tsp onion powder
- 1 tsp garlic powder
- 1/2 tsp gluten free baking powder
- Salt and pepper to taste
- 1/4 cup mozzarella cheese
- 1/2 cup parmesan & mozzarella cheese blend
Instructions
- Preheat oven to 425 degrees F. Line a baking sheet with parchment paper and spray with cooking spray.
- Whisk eggs, olive oil, Italian seasoning, onion powder, garlic powder, baking powder, and salt and pepper to taste.
- Add cooked quinoa and mozzarella cheese to the egg mixture and mix well with a spoon until everything is well blended.
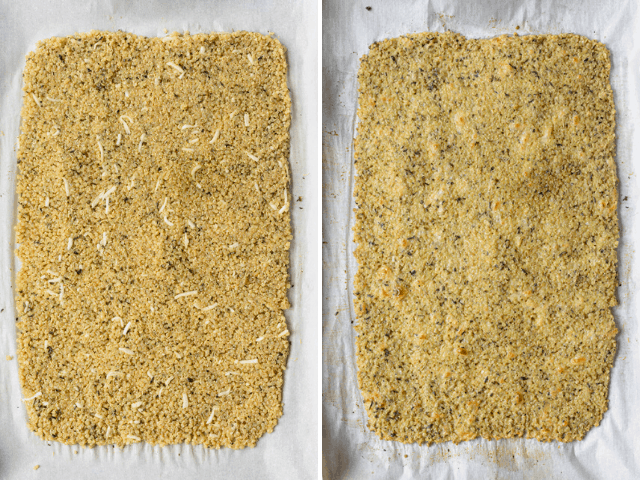
- Spread the quinoa dough into a ¼ inch, even layer on the parchment paper into desired shape.
- Bake for 15-17 minutes until it becomes golden brown.
- Remove from the oven and top with shredded cheese and bake for additional 5 minutes, until cheese melts.
- Enjoy immediately, and serve with marinara or any sauce of choice.
Notes
Nutrition
Nutrition information provided is an estimate. It will vary based on cooking method and specific ingredients used.
my sister and I made this along side the frozen pizza crust from trader joes. My sister and I both agree we prefer this crust more! It gets super crispy and tastes cheesy. SO GOOD and I love how clean the ingredients are. Will definitely make again.
Aww, that’s amazing!! So glad to hear that!!
Can I make the dough ahead of time? If I can, how should I store it?
Yes you can make the crust ahead of time and then top with cheese to reheat before serving. You can also mix the dough ahead of time and keep it covered in the fridge for up to 3 days or in the freezer for up to 3 months.
I always make quinoa, so shaping it into pizza crust was so much fun and easy. Super delicious appetizer. Keep it up with healthy recipes.
So glad to hear that you made it and liked it! Thank you!
I am lost for words and thats not often. I love your creativity in healthy food, daily snap motivations, positive attitude, and your sweet responses to my novice self.
Thank you my dear
Aww, that means so much to me! Thank you so much for the sweet message from you and for following along with me on snapchat!! 🙂 🙂